Showing posts with label Figure Sketches. Show all posts

Monday

Sketchbook Video Flip Through -- Holidays in Ink Challenge


Happy New Year, everybody! I can't believe Holidays in Ink is over. I'm still mentally processing everything from this challenge. Here's a video tour of the sketchbook I created during the challenge.

A note about the figurative works: Except for the dancers in primary colors, they were done during weekly figure drawing Zoom sessions that I do with a few friends. We've been working from master paintings, allowing 20 minutes for each. The figures are therefore a bit more stylized than they would be if we'd been using photographs.

Sunday

Megasketch Monday -- Silhouette Power

Pentel Pocket Brush Pen with Platinum Carbon Black ink

If you open up the Roger Tory Peterson Field Guide to the Birds, the first thing you see is a two page spread of bird silhouettes. What always surprises me is that each bird is so identifiable from its silhouette alone. Their poses are also perfectly in character, sitting on wires, standing on a fence post, walking along the ground, or looking up and chirping. Silhouettes seem simple, yet they can tell a

Saturday

Project Megasketch -- A Perfect Solution for Your Winter Blues


If you're an artist who doesn't like winter, maybe this post is for you! I used to hate winter. If you live in a cold climate and you're a plein air painter, you probably know what I'm talking about.  One solution for the Winter Blues is to give yourself a special winter art project to break free from your own mold.

Last winter, I embarked upon a drawing/painting/sketching challenge to see objects in a different way, and learn to capture them faster. My hope was that when I ventured out again in the spring to paint, the drawing/blocking in stage would be quicker and more accurate. I wanted to tackle subjects that I found difficult, or required a lot of maintenance and practice, such as perspective, drawing straight lines and round elipses, and being able to sketch a portrait likeness in just a few minutes. I wanted to improve on capturing the elegance and directions of tree branches, the graceful movements of animals, the bustling activity of people walking, and copy some works of the masters to explore their methods. I experimented with mixed media, and broke out all those fun art supplies that I rarely have time to use, or that have been sitting on the shelf untested.


I dubbed this venture Project Megasketch, and began it last November. I finished in April. Maybe it can help you get through the Winter Blues this year, while venturing into new art territory. For those who want to give it a try yourselves, or just follow my project along for ideas, stay tuned. Yours may have different subject matter and goals, but you can create a project that will benefit your art with the development of skills and exploration of techniques by following the process. I'll post regular prompts and examples from my project to help get you started and inspire you in the weeks and months to come. There aren't many rules to follow.

Project Megasketch Rules:


  1. Complete 600 pages, minimum size 9x12"-11x15", in any media. (Or set a different number of pages and size if that's too overwhelming. Make the challenge your own.)
  2. Fill each page. No cheating with half-empty pages!
  3. Work for sale or publication doesn't count. (More about this below.)
  4. Set dates to start and finish. It's okay to adjust that later if you have to. Life happens!
  5. Challenge yourself, but have some fun too.
  6. Trust the process.


Having read this far, if you're still interested, get a few sketchbooks the same size, or one enormous

Tuesday

Expansion of the Hudson River School Art Trail


8.5x11" across a two page spread of a Stillman & Birn Alpha Hardbound sketchbook
Platinum Black Carbon Ink and Watercolor
Image can be clicked to enlarge

On June 2, the official announcement was made about the expansion of the Hudson River School Art Trail to include many new sites. Kevin Avery, from the Metropolitan Museum of Art, gave a wonderful lecture at the Thomas Cole National Historic Site about these official Art Trail locations as well as other spots where the Hudson River School Artists did some of their most famous work and their plein air studies. (Of course I couldn't resist sketching during the lecture.) Click here to read more about the Hudson River School Art Trail. You can download maps and information on the website.

Sunday

More Watercolors from Open Studio Life Drawing

11x17" across a two page spread in my altered book
Watercolor
 
In a session of short poses in life drawing, I find there is not enough time to draw and paint each pose. Some open studios have longer poses, but in our sessions, the longest pose is 20 minutes. If I plan to paint, my only option is to start throwing paint from the moment the model takes the pose, and hope for the best! There is no time to draw first, or correct, or fiddle much. I like doing them in montage formats like this, but every once in awhile I pull out a single sheet of nice paper and do a separate painting, like I did for the one at this link.

Thursday

Afternoon in the Figure Studio

11x17" across the spread in an altered book
Golden Black Gesso
Winsor Newton, Holbein, and Schmincke Gouache

These poses were just 30 seconds to a few minutes each in an open studio life drawing session with a fabulous model. Since the poses are so short, I usually do them in some sort of a montage format. I had this page spread prepared in advance using Golden Black Gesso, and since I happened to have gouache and watercolor with me yesterday (thanks to my new palette setup), I thought it would be fun to play with different gouache colors on the black background. I loved the way it turned out, and my only regret was that I hadn't prepared more pages this way. I think I'm going to prepare some black supports with "glittery stuff" like I used for some of my aquarium sketches, and bring them to life drawing next week. Way fun!

(Sorry about the glare on the right page; I just couldn't seem to get an image without glare on one side or the other.)

Little Girl in the Greenhouse

Click image for a larger, clearer view
Pitt Big Brush Pens
Stillman & Birn Epsilon 5.5x8.5" hardbound sketchbook

This was my last quick sketch of the day at Adams Fairacre Farm. There were so many great statues in the greenhouse that I wished I could have stayed longer, but we all lost two hours of sketching time having an extremely enjoyable lunch in their dining area, while discussing possible future plots of Downton Abbey and admiring each others' sketchbooks! It was time well spent relaxing with fellow friends and artists.

I have to say, I really enjoyed working on the white paper these past couple of sketches! I only have one colored page spread remaining in this book, and several black ones, so I went to the few white pages remaining. It's time for me to start thinking about what journal will come next. I sure would like to work bigger if my back will stand up to me holding a larger book while sketching out in the field.

Tuesday

More Sketching with Pitt Big Brush Pens

Pitt Big Brush Pens
Stillman & Birn Epsilon 5.5x8.5" hardbound sketchbook

Today our sketch group had its monthly sketch-out at Adams Fairacre Farm in Wappinger, NY. Patricia and I arrived at 10am and made ourselves comfortable in the dining area while waiting for the others. In honor of Valentine's Day, I had a chocolate caramel flavored coffee. It seemed like the right thing to do!

I've really been enjoying exploring all the colors and combinations of the Pitt Big Brush Pens I got recently. I'd prepared this page with a diluted teal-colored acrylic wash, followed by some iridescent/interference paint to give it some shimmer. I'd planned to use it with Private Reserve Blue Suede ink, but since I had a teal-colored Pitt Big Brush Pen with me, I pulled that out to do all the initial drawing, then added a bit of color with some of the other pens.

Webcast alert! Remember that Wednesday night (2/15) I'll be a call-in guest for the Goulet Pen Company's webcast, Write Time at Nine. I'll put up a link on my blog before the broadcast. The Goulets will probably get the link up before I do, so if it's not here, try their blog: http://inknouveau.com . Hope to see you there! I'll be revealing the preliminary results of the lightfastness testing that I'm doing with the Noodler's Eternal Inks, and fielding any ink-related questions pertaining to sketching and artwork.

Saturday

Pitt Big Brush Pens and Some Quick Figures

This image is clickable if you wish to view an enlargement.
Quick figure sketches from photo references (The Figure in Motion)
Pitt Big Brush Pens: Dark Sepia, Raw Sienna, Light Flesh
Some blending done while wet, using Niji waterbrush
All images in this post were done in my altered book

When my order of Big Brush Pens arrived a few days ago, I did a color chart so I could see the actual colors on this paper. I set out some color groupings that I thought would work well together and provide me with at least three values. In anticipation of attending open studio life drawing the next day, I warmed up with some sketches from photo references --- easier than drawing from life, since the translation of three dimensions to two dimensions is already done for you by the camera! Still, going straight in with ink is always a challenge. I liked the way the colors worked for those sketches above, so I plan to keep that color grouping intact.

So, with at least one group of three markers that I know will work together, and some ideas for others, off we go to a session of short poses! I didn't photograph all the pages because it is such a time consuming process, but here are a few pages worth. These were all 20 minute poses, done from life. I sampled some of my other color groupings. After doing a few sketches, I did one with a more conventional drawing medium too --- a Sepia Cretacolor lead.

 Left: Pitt Big Brush Pens in Caput Mortuum, Sanguine, Cinnamon, Light Flesh
Center: Pitt Big Brush Pens in Indanthrene Blue, Ultramarine Blue, Sky Blue
Right: Sepia Cretacolor Lead, blended with a finger (and accidentally smudged by my hand!)


Pitt Big Brush Pens in Dark Sepia, Raw Sienna, and light flesh for the figure. Colors added in Deep Scarlet, Sky Blue, Ultramarine, Light Green for table and stool.

It's a tall order in short poses in life drawing to take on a medium that doesn't move much and can't be erased. But I enjoyed it, and I'm sure these Big Brush Pens will become part of my regular sketching materials for various subjects. I'm not sure if I'll be bringing the brush pens next time, or use something else; I have lots of ideas cooking in my brain. But it's always a fun time, and a great place to experiment with various approaches and mediums.

Thursday

Altered Book --- A Little Side Project


Quick boat studies
11x17" across a two page spread in my altered book

Although I prefer to work just in one main art journal at a time, there are sometimes reasons for turning to something else. In this case, I didn't want to burn through a lot of good, expensive paper for quick sketches and experiments. My plan was to use this other book for short poses in life drawing sessions, as well as quick practice sketches of one kind or another that I don't want to put into my art journal. I decided to take an old 8 1/2 x 11" book which still had a good, solid binding, and gesso pages to sketch on. That way it would be very inexpensive, and the gesso would soften the background text or images to increase depth while eliminating the visual distraction or competition with the sketches.The sketch above of the boats was done over one of the maps in the book. I thought it rather appropriate that they were sketched over oceans!

I selected a book with a lot of graphical content, as well as pages of full text. I used Golden Acrylic Gesso, and also tried some pages with Golden Absorbent Ground, as well as a couple with Golden Black Gesso just for fun. I thought the Absorbent Ground might provide a better working surface if I wanted to add any watercolor washes. The sketch above of the boats was done using Pitt Brush Pens on pages coated with the Golden Absorbent Ground. (Just because I liked the idea of doing them on the page spread with the map, and that happened to be prepared that way.)


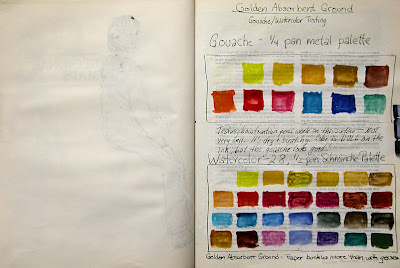
I tested out my gouache and watercolor palettes to see how the colors would look on the surface of this paper with the Absorbent Ground. Answer: Pretty dull, though in person they have more vibrancy than they do in this digital image. Plus, it wrinkled the paper more than the Golden Acrylic Gesso. Speaking of which, if buckling paper bothers you, an altered book like this is probably not something that would interest you. Even pages coated with gesso did wrinkle. Of course, this paper was designed for printed text, and not for wet media! The gesso does add strength to the paper and gives it some sizing, but at the cost of some wrinkling. I dried each page spread with a hair dryer as I went along, then set it under a very heavy coffee table book overnight to help control some of the wrinkling.

On the left side above, you can see the ink from a sketch on the previous page coming through the paper a bit. That was a blank page, so I didn't coat it with anything on either side. Pages that were sized with either the Golden Acrylic Gesso or the Golden Absorbent Ground did not bleed through, nor show ghosting of images on the reverse side of the pages. (The wrinkling on that left hand page is just from the little bit of watercolor used in that one area of the previous page, and not from applying a sizing.)

Below, the page on the left was sized with the gesso. The page on the right was only sized in one area.  I left the more graphical page text that was printed on the right side. I thought I might use it as inspiration for some doodles, and I just kind of liked it! On several of the pages, I left bits of text, titles, or graphical elements without applying gesso over them.


I took the book to life drawing a couple of weeks ago. It was my first time going to an open studio session this winter, and go figure; the model didn't show! Some people from the group took turns doing three minute poses, and then everybody went home. These were a few of the three minute poses I did to test drive the book. I used a Wolff's 6B carbon pencil with a waterbrush, and added some light washes to a couple of the figures.

From time to time, I'll be showing some of my figure work or sketches done in this book, but for the most part, it's for short poses, quick sketches, doodles, border designs that I'm working out, testing ideas for fonts, and other things where I not only don't want to waste high quality paper, but for the most part, it's not even worth taking the time to photograph, adjust and post the images! However, in the interest of exposing other artists to the potential for using old books, I thought it was worth the post. I had initial pangs of guilt about "destroying" a book. But it wasn't too hard for me to convince myself that a book is not a one-of-a-kind work of art. In this age of reusing, repurposing, recycling, and reducing waste, creating sketchbooks from old books feels like a good thing to do. If you are opposed to using a book this way, consider doing it with a phone book or old catalog!

Saturday

Lunch Break

(Click image for a larger, clearer view.)

When my sketching group goes to Adams, we all meet in the cafe area for lunch at noon. It's a golden opportunity to catch some quick gesture sketches of customers at a nearby register, or seated in the cafe. I sketched them in with Noodler's Luxury Blue ink in a Pilot Plumix italic pen, and used the same ink for the smaller writing on the page. (The large title is watercolor, painted with a brush.) This ink washes just a tiny bit with a water-filled brush, and I supplemented that with watercolor over the top of the ink sketch.

People often ask how I select my colors for a given scene. Often my choices are inspired by one of the borders or backgrounds that I pre-painted in my book. Other times I know what colors I want to use when I look at the scene, and I look for a painted page spread that will accommodate those colors. For this scene, I really wanted a white page to sketch on. Any border colors would have worked as long as I had the white center; I'd just sketch with the colors present in the border. But I have to confess, I was really happy to come to this blue border and be able to put the Luxury Blue ink to good use! It's become one of my favorites.

Monday

Sketching at the Jefferson Valley Mall

I went to the Jefferson Valley Mall with a group of artist friends, where we were nearly evicted by a security guard for sketching! These were done on pages I'd prepared in the S&B Alpha sketchbook that I've been reviewing.


Sunday

Part IV of Stillman and Birn Alpha Review --- Road Trip!

To read this review from the beginning (Part I), click here.

Finally the time had come to take the Alpha sketchbook on the road and answer questions that come into play in a real sketching situation. The questions I wanted to be able to answer by the end of the day were:

  1. Was this particular book a good size to hold while sketching standing up or sitting down, in terms of size and weight?
  2. Did it stay open pretty well, or did I have to wrestle with the pages as I sketched?
  3. Is the gutter in the center of the book too deep to comfortably work across two-page spreads?
  4. Did the pages buckle as I painted on top of the prepared surface?
  5. Is the result of doing prepared pages before going out sketching worth the time invested, or the expense of a book constructed well enough to handle that process?

I went with my sketching group to Adams Fairacre Farms. They recently opened a huge, new store in Wappinger, New York, complete with a greenhouse, gift shop, prepared foods section, seating area to eat, and full service grocery store. I asked the manager if it would be okay for us to spend the day sketching there, and she was very welcoming! Five of us assembled there at 10am to sketch. The holiday displays were stunning, food was delicious, and we got to do grocery and gift shopping too.

I started out in the greenhouse, where the splash of color of the poinsettias would surely satisfy the color junkie within me. Standing up as I sketched in my initial lines, I found this size book very comfortable to hold. No backache! Also, the pages were flexible and light enough so that they didn't do battle with me in trying to keep the book open. However, I wasn't expecting the book to be quite so cooperative. In anticipation of battle, I had cut a piece of coroplast (nearly weightless, corrugated plastic) to the size of the open sketchbook, and stuck it in my messenger bag along with two large metal binder clips. Since I had that with me and it is such a convenience, after awhile I pulled it out and clipped the open sketchbook to the board.


The book was small enough for me to also hold my tiny watercolor set in my left hand, while holding the book on my left arm, and my right hand could wield the waterbrush. Still no backache! This answered my big question about whether or not I could comfortably paint standing up with this book. No problem at all.

That inner color junkie still wasn't fulfilled, so I went into the adjoining store and set a small three-legged stool in front of this incredible poinsettia tree display. (See below. The arch beyond the tree leads into the garden center/greenhouse.)


Although I hadn't planned on having enough space to set out a stool and actually be comfortable, there were some open areas around the store that made it easy to do so, and I had a pack stool in my car. I was definitely getting a good feel for this setup by now. With two watercolors done, there was no page wrinkling. I suspect that the small bit of acrylic on the paper helped to minimize additional buckling.

It was noon and time for the group to assemble in the eating area for lunch. I managed to get in a rough pen and ink sketch while chatting with the other artists. I found myself wishing that the book didn't have as deep a gutter. This was more of an issue in drawing, and especially writing, than it was in painting. Drawing across the gutter wasn't a smooth ride, but it wasn't as bad as using a spiral either. Writing text across it wasn't going to happen without planning for the breaks between words to fall in the center. Still, the cohesiveness of the two page spread is way better than with a wirebound or spiral bound book. IMPORTANT NOTE: Since doing this review, I learned from the company that you can break in the book before you start working on it, so that the pages will lie completely flat. I did a blog post about it, which you can see by clicking here. There is no gutter problem at all with this book if you follow that breaking-in procedure! (Not currently recommended for the 4x6" books, but you can do it with all their other hardbound sizes.)


After lunch, I went to the gift area, where there was a lot of open space and large displays of decorated Christmas trees, holiday lights, and even Santa flying a chopper suspended from the ceiling. Not only was the scene utterly captivating for somebody who likes lights and sparkly stuff like Yours Truly, but by sheer coincidence I'd arrived at a page with a border that had red, green and gold.


By this time, I'd answered the questions that were on my list for the day. To recap:
  1. Was this particular book a good size to hold while sketching standing up or sitting down, in terms of size and weight? The size was easy to hold, small enough that I could still hold my tiny watercolor set, and light enough so that I didn't get a backache. However, I really would like to work larger, mostly because I like these prepared borders on the pages, and they eat up a lot of my available painting space. The larger book (8.5x11") might be too large or heavy for this particular situation though, and there is no size in between. I'd have to go out with the larger book and give it a try sketching on location to know if that would be doable for me.
  2. Did it stay open pretty well, or did I have to wrestle with the pages as I sketched? The book stayed open fairly well. I still had to hold open the pages, since they don't open completely flat like a Moleskine, but I didn't find it nearly as cumbersome as the very slightly larger Fabriano Venezia, which has stiff, heavy pages that require serious wrestling talent. It was made even easier by clipping the book to my open coroplast support, with very little additional weight. 
  3. Is the gutter in the center of the book too deep to comfortably work across two-page spreads? It wasn't so awkward for painting, but was more so for drawing, and quite awkward for writing across the center. Still, way better than a spiral or wirebound book, in terms of wanting the two halves to feel like a whole in the end. IMPORTANT NOTE: Since doing this review, I learned from the company that you can break in the book before you start working on it, so that the pages will lie completely flat. I did a blog post about it, which you can see by clicking here.
  4. Did the pages buckle as I painted on top of the prepared surface? No!
  5. Is the result of doing prepared pages before going out sketching worth the time invested, or the expense of a book constructed well enough to handle that process? I am loving the finished pages with the borders and prepared surfaces, and I think they definitely enhance the sketches and contribute to my art form. In terms of the expense of a book that can take that amount of media without falling apart, it's well worth it to me. They are a collection of my artwork when finished, as well as a life journal, and I want them to last forever. So far, I'm a happy camper.
To see Part V of this review, which covers working on the plain white paper in wet and dry media, click here.

Friday

Traveling to Florida

My sister got married last weekend in Florida, so my husband and I flew down for the wedding. I didn't get much of a chance to sketch this trip, but managed a few pages. This one was on the way down, when I grabbed a few minutes while waiting for the bus to take us to the airport, and again in the waiting area before boarding the plane. We took off 20 minutes early, so that waiting period was a lot shorter than I thought it would be!

Saturday

The Many Sides of Mr Lute


11x17" across a two page spread in a 8.5x11" Stillman & Birn Epsilon book
Noodler's Zhivago in a Lamy Safari B nib
Private Reserve Chocolat mixed 1:1 with Private Reserve Velvet Black in an 05 Platinum Preppy
Noodler's Wampum in an 05 Platinum Preppy
Cacao du Bresil in an 03 Platinum Preppy
Noodler's Midnight Blue in a 6mm Pilot Parallel

I found this porcelain lute player in a post holiday sale at Christmas Tree Shoppe one year. He makes an occasional appearance in my sketches and doodles. I thought several sketches of him on the page would present good drawing challenges and a unified theme. I jumped right in with ink, and a Niji Waterbrush was used to do the washes.

I love the blend of the Private Reserve Chocolat and Private Reserve Velvet Black. It tones down the red of the Chocolat washes just enough, and amplifies the value range. Furthermore, after sitting in a Preppy fountain pen for a few months without being used, it started up immediately when I turned it over to draw!

Sunday

Figure Drawing


Today I went to open studio figure drawing for the first time in over a year! Every year, I attend regularly during the winter months when it's freezing cold out and I don't enjoy plein air painting. There's nothing like drawing from a model to sharpen drawing skills. But this past winter there just didn't seem to be a session around that fit conveniently with my schedule. The one I went to this morning was in Hudson, at the Opera House. I don't think I'll be able to do this on a regular basis there, but it sure was fun to be back in the figure studio again. Poses ranged from 1 to 25 minutes. This one was a 15 minute pose.