Wednesday

More Watercolor and Gouache Palette Talk


Many people have been asking me about this watercolor palette over the past couple of days. I have explained in a previous post what I did, but perhaps that got overlooked because I didn't provide a photo of the actual conversion (above). When I bought this palette, it came with twelve half pans, secured in metal holders. I hated the paints. I took out those paints, replaced the colors with my favorite tube colors, and over the years have reconfigured it many different ways.  If you're interested in one of these, I've found the palette alone for a very reasonable price at Wet Paint Art --- click here.

I really like the size of this palette. It's small and portable, even when the flaps are opened up, and not too heavy for a metal palette. If you look at the image below, you'll see that you can not only fit half pans into two rows, but if you use the middle section (which is meant to hold brushes), you can fit a third row in there too.
For a long time, that's the way I configured this palette --- with three rows of paints, like the image below:


When looking for a way to incorporate my gouache pigments in the same palette as my watercolors, I needed more space. I removed the metal plate and clips that hold the half pans in the case. By doing that, plus turning all the half pans so they ran horizontally, I could fit in another entire row of half pans! Using just the outer metal case and removing the inside dividers also lightened the palette considerably. I secured the half pans in the case using the white tacky putty you can get at Staples or in craft stores to hold posters onto walls.

In the first photo at the top of this post, the bottom row of paint is gouache. You can read more about my pigment choices and this setup on this post. Remember that if you put watercolor and gouache into the same palette, you have to be sure to keep them separate when you mix your colors! Allowing the gouache paints to migrate into the watercolor pans will diminish the transparency of your watercolors. I use the bottom metal flap to mix my gouache, and that leaves the top two, larger mixing areas for my watercolors. Since I generally go from transparent to opaque (if I go opaque at all), I use the entire palette for watercolors, then just the bottom for gouache near the end of the process. I clean off the bottom mixing area before using it again for watercolor.

Tuesday

Hike to the Overlook Mountain House Ruins

Watercolor, 7.5x15" across a two page spread 
of a handmade hardbound Arches 140# Rough watercolor book
Image can be clicked for a larger, sharper view.

Last weekend, my husband and I climbed two and a half miles up Overlook Mountain to the ruins of the old Overlook Mountain House. All that effort really does pay off once you arrive at the dramatic structures. I sat on a stone stairway opposite the main building to do this quick watercolor and enjoyed every second of it! I hope to do some paintings and sketches from photos I took there, but I wanted to do at least one on location. The bugs were horrendous, and in spite of using DEET spray that was 98% pure, I got bitten to pieces in the process. Hiking down was a lot easier than going up there. I am so glad that I have some really lightweight painting/sketching gear now to take along on trips like this one.

Monday

May Ink Drop

11x17" across a two page spread in a Stillman & Birn Epsilon Hardbound sketchbook
De Atramentis Rose
De Atramentis Hyacinth
De Atramentis Elderberry
Diamine Meadow
and Pilot Iroshizuku Murasaki-Shikibu inks
Assorted dip pens

At the beginning of every month, five vials of ink samples arrive in my mailbox via the Goulet Pen Company Ink Drop. I don't always have time to test drive all of them right away, but this month I pulled them out and played with a bunch of dip pens to see what the colors looked like and how they washed with a wet brush. Every color was a winner, and I found myself surprised by how much I enjoyed working with the scented inks like the Rose and Hyacinth.

None of these inks are "archival" in terms of being able to hang a sketch on a wall where it would be exposed to sunlight. But they should fare fine inside a sketchbook as long as it's not dipped in water!

Sunday

Spring Flowers from My Garden

11x17" across a two page spread of a Stillman & Birn Epsilon Hardbound book
Watercolor and Pitt Big Brush Pens

Sometimes it's easier to tackle a single rectangle than to take on an entire two page spread, so I really enjoy setting up grids for various series of things I want to paint when I'm short on time. You can click the image above for a larger view of the sketch.

Here's my setup below, as I finished up the final section. I have a piece of Coroplast (corrugated plastic that is nearly weightless) to which I velcro my palette and clip on my palette cups. It extends under part of the book, which weights it down so it won't fall over. That leaves me hands free.

Tuesday

Nomadic PE-07 Pencil Pouch Review --- Peek inside my sketch kit!


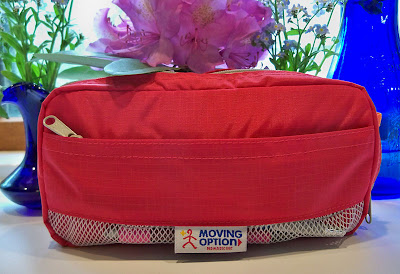
Finally, here is my review of the Nomadic PE-07 Pencil Pouch, otherwise known as my lightweight sketch kit! I'm going to give you a peek inside to share what's traveling with me everywhere these days. I bought a Nomadic Messenger Bag quite some time ago and I use it so much that I thought I couldn't go wrong with some more of their products. The pouch comes in lots of nice colors, and I love red. The small zippered compartment in the front is a very convenient place to keep items that I need to reach for first --- like a pen, pencil and eraser. I can do my initial sketch without having to even open up the bag. If I decide to paint or use brush pens, I then proceed to the larger, inside compartment.

Above is a photo of the pouch from the side, so you can see some of the nifty dividers, with supplies in there too. (The pouch looks orange in this photo, but only the inside is orange.) I like having that thin, center section with the zipper. It gives me a safe place to store my Escoda travel brushes, where they can't fall out even if the bag tips while open. I took out the pen, mini watercolor set, and waterbrush to do the sketch above out on location. Removing the rest of the contents, you can see how much I'm able to fit into this clever little bag in the image below:


Inside the pouch is stashed a mini set of gouache as well as the watercolor set, a vial that I filled with Dr. Martin's Bleedproof White, my beloved Kaweco Lilliput fountain pen, a few water brushes, three Escoda travel brushes, one travel squirrel mop brush, a small travel sable with protective sleeve, a grey Pentel Aquash brush pen, a Kuretake refillable brush pen, architect pencil, little mouth/gum scrubber to scrub out paint, Mini Mister to spritz my palette or sketch, small container of water (little yellow bottle), palette cup, two metal office binder clips to hold down sketchbook pages, UniBall Vision rollerball pen, and small piece of eraser. Whew, that was a mouthful! Typing it all out, it's hard to believe that it all fit easily into the pouch. I have since added a piece of sponge in there as well, to wipe my brushes as I paint.

This pouch is so so well designed and constructed. It has just enough compartments and dividers for me to separate items into categories, without having so many that they take up needed space or make it hard to find what I'm looking for. It weighs nothing, is small enough to stash in my purse, and super-convenient to toss it into my backpack if I'm going hiking or traveling and need an ultra-light art kit. This and a sketchbook, and I'm good to go anywhere. I've already taken it on many hikes and outings. Like all art bags and sketch kits, it will continue to change and evolve, so I'll be sure to show it again in a year or so. It will be interesting to see how the contents have changed in that time.

So, is there anything negative about this bag? Well, initially I wished it was a bit larger. However, I'm now glad that it's not. One thing I've learned about myself over time is that no matter how big a sketching bag is, I know how to fill it to the brim, and I'm going to do that! Therefore, the secret for me to traveling light is to have a small bag that can only accommodate so much. In my dreams, I have a large, light bag. It contains everything I ever wanted, and there is plenty of room left over. But in reality, my bags are always packed to the brim with way more stuff than I could ever use in a single outing. Clearly the supplies in the photo above are more than ample for a sketch outing. One day last weekend, I forced myself to cut the contents in half, and I didn't find myself missing a thing when I went to sketch! So now I can honestly say that the pouch is perfect for its intended purpose. I love it. And it's mine. And I'm not giving it up. So if you want your own, you'll just have to hustle on over to JetPens and get one for yourself.


Saturday

Waiting for My Car

6x18", across the two page spread of a Stillman & Birn prototype hardbound Beta sketchbook

I got a flat tire on my way home from delivering paintings to a show a couple of weeks ago! I was driving around looking for a good sketching location when I heard a strange noise and pulled over to the side of the road. Fortunately, at that point I was only five minutes from my husband's office, and what a guy! He came over and changed the tire for me. 

The next morning I took my car to the repair shop for a new tire and an oil change. They were so fast that I didn't even have time to finish my sketch. I didn't realize at the time that the bright red car on the left belonged to the guy who did the work on my car. He was happy to see it immortalized in my sketchbook! I told them if they had taken longer, I would have been able to finish my sketch. They replied that if they hadn't been so slow, I'd not have had time to sketch!

Friday

Sketching with Mary on a Rainy Day

6x18", Watercolor
Across a two page spread in a Stillman & Birn Beta hardbound 6x9" sketchbook (prototype)

It's not always easy to find a composition that will work across a two page spread in a landscape format book. My friend Mary had this long boat sculpture that helped ease my way across the spread! She came over to sketch on a rainy day in April. We set out spring flowers from our gardens and all sorts of odds and ends and had a blast. Bleeding Hearts and Bluebells were in abundance that day.

Thursday

Big News from Stillman and Birn

Two page spread from a Stillman & Birn Beta prototype hardbound sketchbook
Watercolor, 6x18" (across the spread)
Click image if you'd like to see it larger

My dream has come true. Stillman and Birn has announced on their Facebook page that they will be expanding their lineup and producing hardbound sketchbooks with their extra heavy weight 180lb Beta and Delta paper. I think I've been waiting for this moment from the first time I ever opened up a sketchbook. For a multimedia artist who loves stitchbound books that open flat, this is a major event and game-changer!

The two page spread above was done in a 6x9" landscape format prototype with Beta paper. I worked across the spread to get the 18". The pages lie so flat that you can barely see the seams, and the paper is so heavy weight that there is no ghosting from images on the other side of the page. It's fabulous!

The books will be produced in the 5.5x8.5", 8.5x11", and European A4 size portrait formats, and not in this landscape 6x9" format shown above. Nevertheless, it has been a thrill to have a sneak peek and to be able to work in one of these babies, and to finally be able to share the good news. This Dogwood Blossoms sketch that I posted a few days ago was also done in this book. I now have my paws on prototypes of the 5.5x8.5" and 8.5x11" sizes, and cannot wait for a chance to dive in!

Dogwood Blossoms

Image can be clicked for a larger version
6x18" on Stillman & Birn Beta paper
Watercolor

My favorite way to work in watercolor is to Just Do It. No pencil lines (or just a few for compositional guidance), no ink......Just straight in directly with a brush and pigment, getting as much down in a single pass as possible. There's something very unique about the way watercolor glows and jumps off the page when it's not fussed with. About six months ago, I ditched the non-transparent colors in my watercolor palette, and found that also made a huge difference in getting the paint and paper to give each other their very best.

That's not to say that I don't need to occasionally bail myself out with opaque lights like Cadmium Yellow or even Titanium White, or that I don't enjoy working with opaque color at times too --- especially on a toned surface. I do. But in restructuring my palette over the past six months, I decided to use gouache for that purpose. After all, if you need to go opaque, that's the way to do it. I took one of the Schmincke palettes that comes with two rows of half pans, removed the metal plate, and squeezed five (yes, five!) rows of half pans into it. Three of those rows were watercolor, and two were gouache. You may recall the post I did about that palette not too long ago. Here's my color chart from that set, as of last week:

It gave me a lot to choose from, but it proved to be heavy for hiking in the mountains. So last week, I pulled out my old palette, which is this one:


I discovered that by removing the metal plate and turning the half pans sideways, I could fit a fourth row into that smaller palette, and it's a lot lighter too. It was hard deciding which colors would stay and which would go, but this is the configuration I eventually ended up with:
 Yep, I'm down to one row of gouache, and kept three rows of transparent watercolor pigments. The dogwood blossoms sketch was one of my test drives for this new setup. So far, it seems to be working, and I'm happy with the lighter weight. Of course, when I need to travel super-light, I can always resort to the mini set I posted yesterday.

This is all a long-winded way of saying that as artists, our ideas continue to change, evolve, and come back around. It's all part of the fun of exploring our world of materials. What we work with depends on what we're painting, what we're painting on, how much time we have, what we're able to carry, and where we're going. And of course as watercolor painters well know, one can never have too many palettes! ;)

I know I promised a tour of my little red sketch kit for today, but I realized I need to take one more photo and do the image adjustment before I can write that post. It will come soon though!

Wednesday

Willow Tree in the Front Yard and Lilliput Review

11x17" across a two page spread in an 8.5x11" Stillman & Birn Epsilon hardbound sketchbook
Ink and Watercolor

I've been admiring the character these willow trees on our property, and looking forward to an opportunity to get out and sketch them. Yesterday after dinner, I was finally able to give into that temptation and scoot outside for 20 minutes or so. I set my stool in front of this massive willow tree and took out my beloved Kaweco Lilliput fountain pen, which is filled with Platinum Carbon Black ink. I love this pen. When closed, it is teeny tiny and perfect for my small sketching kit. The cap screws onto the back, so it posts firmly, and becomes long enough to sketch comfortably. If you click that link above, you can see lots of different views of the pen with a penny for size reference. Below is a photo of it next to my new (ultra-cool and more about this soon) Uni Gel pencil, so you can get an idea of the size compared with a mechanical pencil. I think this photo actually makes it appear larger than it is though.


I'm a big fan of Kaweco fountain pens and have quite an assortment. They are smooth, wet writers and highly reliable. The plastic-barrel Kaweco Sport pens can be converted to eyedropper pens, but since the ink can corrode metal, the Lilliput model cannot be converted. It has other benefits though, like its compact size, and the way it slips into my small sketch bag like a long silver bullet. It never leaks. It always starts right up. It writes like a dream and can keep up with my quick sketching without skips. For a little pen to slip into a pocket or small pouch, it simply can't be beat.

You can see in the photo above that the Lilliput pen, when posted with the cap, is certainly an adequate size for writing and sketching. It is thinner than a regular fountain pen, though that doesn't bother me.

After drawing for awhile, I decided to entertain my inner color junkie, and pulled out my mini watercolor set. That and a waterbrush were all I needed to complete the large, two-page spread. These three items --- Lilliput, waterbrush, and mini pan set, could have fit into a pocket. The little watercolor set can be found at Wet Paint. I pop out the kids' paints and substitute with my artist grade tube colors. For this sketch, I used Winsor Newton French Ultramarine, Aureolin, Brown Madder, and Daniel Smith Quinacridone Gold.

Tomorrow I'll take you on a tour of the little red bag in the photo. It is host to the contents of my current "small sketch kit". I can toss that pouch into any bag or backpack and I'm ready to go on a sketch outing.