Showing posts with label Altering Books. Show all posts

Monday

Megasketch Monday -- My Big Regret

Part of my current "Inspiration Wall" in the studio
Project Megasketch has influenced and improved my art and creativity in more ways that I can count. However, if there were a single thing I wish I'd done differently, it would be this: I wish I'd taken the book apart from the very beginning, and used only one side of each page.  That is my big regret.

Initially, I didn't see that a 600 page bound volume would be a problem. As the page numbers grew, the negative aspects of a double-sided, single volume multiplied. I didn't realize the full impact until the project was over.  If you're part way through the project, and working in a stitch-bound book, you may want to consider changing to a loose sheet system. I wish I had for so many reasons.

To arrive at our destination, we need to use what we've learned, see the path we are on, and use that for inspiration in moving ahead.
  • What has inspired you on your megasketch journey so far? 
  • Which sketches represent what you need to see more of in your work, or a direction you'd like to pursue further? 
  • What have you done that could serve as references for a series, or to chase an idea all the way to its conclusion? 
  • Which ones teach lessons, alerting you when you've taken a wrong turn?
I use a wall in my studio to answer these questions. It influences the way I work. The image above

Wednesday

A Day at the Farm

11x17" (across the spread) in a Stillman & Birn Zeta Sketchbook
Background monoprinted in several layers with a Gelli Printing Plate

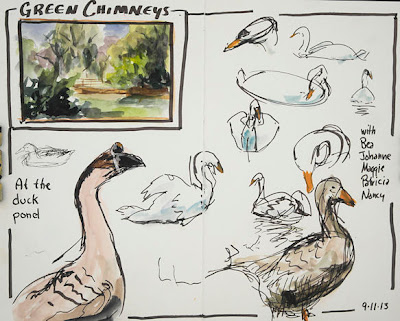
My plein air group went to Green Chimneys today, which is a residential facility for children. Their philosophy is that children benefit greatly from caring for and interacting with animals. They have a wonderful farm on the campus. Many of the animals here have been rescued and are in the rehabilitation process, not so unlike the children that reside here.

It was over 90 degrees today, and you'd never know we were into September. Due to the heat and my love of the animals, I decided to spend the few hours there sketching instead of working on a single painting. Of course the animals were in constant motion, so the sketches were gestures, done as they moved about. The sketch above (which you can click on to enlarge it), was actually the last one of the day. It was done across a two page spread of an 8.5x11" Stillman and Birn Zeta hardbound book, which gave me a full 11x17" work area. This is extremely heavyweight paper (180lb) and is fabulous for multi-media work. I've been using a large Gelli Printing Plate to print textured layers of color across the pages. I've done it in both Zeta and Epsilon books. I love having a toned, textured ground to sketch against, especially when working in monochrome. I sketched with a Faber Castell Pitt Calligraphy Pen. I wished I'd brought a bunch of Pitt Brush Pens with me, but alas, I did not.


Above is a two page spread in a smaller Zeta book, without a toned ground. The book is 5.5x8.5", which gives me a letter-size space when working across the spread. When we first arrived at the location, we gathered near a small pond filled with several different types of ducks, geese, and some beautiful swans. They were all highly entertaining! I started out with the little watercolor thumbnail sketch of the pond scene, then did some gesture sketches of the geese and swans, using the same Walnut Brown Calligraphy Pen, and a little watercolor.


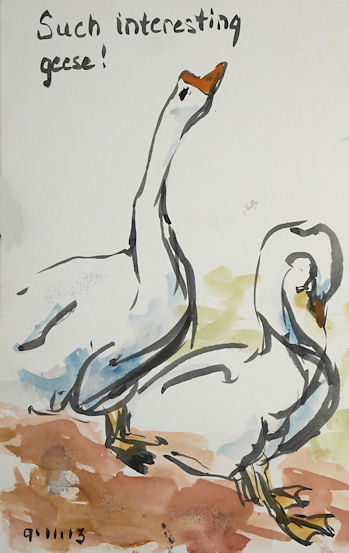
I got tired of the brown and wanted to work with a brush, so for the sketch above, I pulled out a Pentel Aquash Grey (or maybe Light Black?) brush pen, plus my Kuretake brush pen, which was filled with Platinum Carbon Black ink. I added orange gouache for the beaks and cerulean blue watercolor for the shadows. I liked these two gestures. The goose on the left kept ducking his head down into the water to drink, then would raise it way up. Every time he stretched his neck and head up, I put in a few more lines!


11x17" across the spread, Stillman & Birn Zeta Hardbound book
Golden Fluid Acrylics background, printed with a Gelli Plate
Sketch done with Golden High Flow Acrylics

My friend Bea called me over to the other side of the pond to witness some swan antics. One kept swimming back and forth in front of me. I found this page that I'd printed using paper doilies on the printing plate to keep some clear areas, and decided to put the swans there. I worked on several views at once, changing from one to the other as he changed direction, swimming around in a circle. I mixed a violet out of some of the new Golden High Flow Acrylics, using Ultramarine Blue and Quinacridone Red, and did the sketches directly with a watercolor brush. The orange is Pyrrole Orange, a color I am becoming quite addicted to!


Sunday

More Watercolors from Open Studio Life Drawing

11x17" across a two page spread in my altered book
Watercolor
 
In a session of short poses in life drawing, I find there is not enough time to draw and paint each pose. Some open studios have longer poses, but in our sessions, the longest pose is 20 minutes. If I plan to paint, my only option is to start throwing paint from the moment the model takes the pose, and hope for the best! There is no time to draw first, or correct, or fiddle much. I like doing them in montage formats like this, but every once in awhile I pull out a single sheet of nice paper and do a separate painting, like I did for the one at this link.

Thursday

Afternoon in the Figure Studio

11x17" across the spread in an altered book
Golden Black Gesso
Winsor Newton, Holbein, and Schmincke Gouache

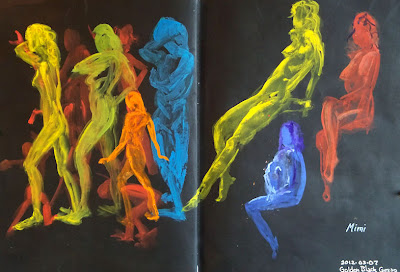
These poses were just 30 seconds to a few minutes each in an open studio life drawing session with a fabulous model. Since the poses are so short, I usually do them in some sort of a montage format. I had this page spread prepared in advance using Golden Black Gesso, and since I happened to have gouache and watercolor with me yesterday (thanks to my new palette setup), I thought it would be fun to play with different gouache colors on the black background. I loved the way it turned out, and my only regret was that I hadn't prepared more pages this way. I think I'm going to prepare some black supports with "glittery stuff" like I used for some of my aquarium sketches, and bring them to life drawing next week. Way fun!

(Sorry about the glare on the right page; I just couldn't seem to get an image without glare on one side or the other.)

Sunday

More Sun Conures

Image can be clicked for a larger, clearer view
Golden Black Gesso
Diluted Golden Interference Acrylics
Winsor Newton, Holbein, and Schmincke Gouache
Sakura Gelly Roll Pen
Stillman & Birn Epsilon 5.5x8.5" hardbound sketchbook

I was back sketching at the Animal Kingdom store again last week. As usual, I was first drawn to my avian buddies in the rain forest room. Sammie and the Cruisers were yacking up a storm, and clearly didn't like it when I paid attention to Duke, the Blue and Gold Macaw. So, I let them once again be the focus of my morning. The only full page spreads I have left in this journal are prepped with Golden Black Gesso and Interference Acrylics. I thought it would make for a good nighttime visit with the brilliance of the coloring of the conures, hence my title "Midnight with Sammie and the Cruisers," even though it wasn't midnight. I was thinking of using the other black and iridescent page spreads for some of the salt water fish that have those beautiful flourescent colors, but most of the big colorful ones were sold! I imagine they'll have some new ones before our next visit.

We only stayed for a little while because the weather was so gorgeous that we decided to go sketch at a farm after lunch. I still need to get the farm sketches photographed, so I'll share those soon.

Saturday

Pitt Big Brush Pens and Some Quick Figures

This image is clickable if you wish to view an enlargement.
Quick figure sketches from photo references (The Figure in Motion)
Pitt Big Brush Pens: Dark Sepia, Raw Sienna, Light Flesh
Some blending done while wet, using Niji waterbrush
All images in this post were done in my altered book

When my order of Big Brush Pens arrived a few days ago, I did a color chart so I could see the actual colors on this paper. I set out some color groupings that I thought would work well together and provide me with at least three values. In anticipation of attending open studio life drawing the next day, I warmed up with some sketches from photo references --- easier than drawing from life, since the translation of three dimensions to two dimensions is already done for you by the camera! Still, going straight in with ink is always a challenge. I liked the way the colors worked for those sketches above, so I plan to keep that color grouping intact.

So, with at least one group of three markers that I know will work together, and some ideas for others, off we go to a session of short poses! I didn't photograph all the pages because it is such a time consuming process, but here are a few pages worth. These were all 20 minute poses, done from life. I sampled some of my other color groupings. After doing a few sketches, I did one with a more conventional drawing medium too --- a Sepia Cretacolor lead.

 Left: Pitt Big Brush Pens in Caput Mortuum, Sanguine, Cinnamon, Light Flesh
Center: Pitt Big Brush Pens in Indanthrene Blue, Ultramarine Blue, Sky Blue
Right: Sepia Cretacolor Lead, blended with a finger (and accidentally smudged by my hand!)


Pitt Big Brush Pens in Dark Sepia, Raw Sienna, and light flesh for the figure. Colors added in Deep Scarlet, Sky Blue, Ultramarine, Light Green for table and stool.

It's a tall order in short poses in life drawing to take on a medium that doesn't move much and can't be erased. But I enjoyed it, and I'm sure these Big Brush Pens will become part of my regular sketching materials for various subjects. I'm not sure if I'll be bringing the brush pens next time, or use something else; I have lots of ideas cooking in my brain. But it's always a fun time, and a great place to experiment with various approaches and mediums.

Thursday

Altered Book --- A Little Side Project


Quick boat studies
11x17" across a two page spread in my altered book

Although I prefer to work just in one main art journal at a time, there are sometimes reasons for turning to something else. In this case, I didn't want to burn through a lot of good, expensive paper for quick sketches and experiments. My plan was to use this other book for short poses in life drawing sessions, as well as quick practice sketches of one kind or another that I don't want to put into my art journal. I decided to take an old 8 1/2 x 11" book which still had a good, solid binding, and gesso pages to sketch on. That way it would be very inexpensive, and the gesso would soften the background text or images to increase depth while eliminating the visual distraction or competition with the sketches.The sketch above of the boats was done over one of the maps in the book. I thought it rather appropriate that they were sketched over oceans!

I selected a book with a lot of graphical content, as well as pages of full text. I used Golden Acrylic Gesso, and also tried some pages with Golden Absorbent Ground, as well as a couple with Golden Black Gesso just for fun. I thought the Absorbent Ground might provide a better working surface if I wanted to add any watercolor washes. The sketch above of the boats was done using Pitt Brush Pens on pages coated with the Golden Absorbent Ground. (Just because I liked the idea of doing them on the page spread with the map, and that happened to be prepared that way.)
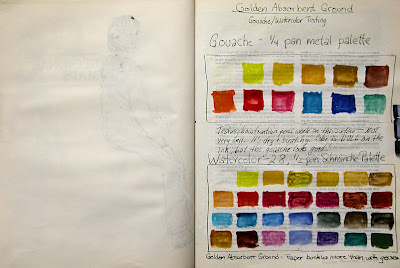


I tested out my gouache and watercolor palettes to see how the colors would look on the surface of this paper with the Absorbent Ground. Answer: Pretty dull, though in person they have more vibrancy than they do in this digital image. Plus, it wrinkled the paper more than the Golden Acrylic Gesso. Speaking of which, if buckling paper bothers you, an altered book like this is probably not something that would interest you. Even pages coated with gesso did wrinkle. Of course, this paper was designed for printed text, and not for wet media! The gesso does add strength to the paper and gives it some sizing, but at the cost of some wrinkling. I dried each page spread with a hair dryer as I went along, then set it under a very heavy coffee table book overnight to help control some of the wrinkling.

On the left side above, you can see the ink from a sketch on the previous page coming through the paper a bit. That was a blank page, so I didn't coat it with anything on either side. Pages that were sized with either the Golden Acrylic Gesso or the Golden Absorbent Ground did not bleed through, nor show ghosting of images on the reverse side of the pages. (The wrinkling on that left hand page is just from the little bit of watercolor used in that one area of the previous page, and not from applying a sizing.)

Below, the page on the left was sized with the gesso. The page on the right was only sized in one area.  I left the more graphical page text that was printed on the right side. I thought I might use it as inspiration for some doodles, and I just kind of liked it! On several of the pages, I left bits of text, titles, or graphical elements without applying gesso over them.


I took the book to life drawing a couple of weeks ago. It was my first time going to an open studio session this winter, and go figure; the model didn't show! Some people from the group took turns doing three minute poses, and then everybody went home. These were a few of the three minute poses I did to test drive the book. I used a Wolff's 6B carbon pencil with a waterbrush, and added some light washes to a couple of the figures.

From time to time, I'll be showing some of my figure work or sketches done in this book, but for the most part, it's for short poses, quick sketches, doodles, border designs that I'm working out, testing ideas for fonts, and other things where I not only don't want to waste high quality paper, but for the most part, it's not even worth taking the time to photograph, adjust and post the images! However, in the interest of exposing other artists to the potential for using old books, I thought it was worth the post. I had initial pangs of guilt about "destroying" a book. But it wasn't too hard for me to convince myself that a book is not a one-of-a-kind work of art. In this age of reusing, repurposing, recycling, and reducing waste, creating sketchbooks from old books feels like a good thing to do. If you are opposed to using a book this way, consider doing it with a phone book or old catalog!

Monday

Breaking in Your Stillman and Birn Alpha, Gamma or Epsilon Hardbound Sketchbook So It Lies Flat

For all of you kindred spirits who share my infatuation with Stillman & Birn Alpha, Gamma or Epsilon  hardbound sketchbooks, I have some great information to share with you! I was talking on the phone last week with Stillman and Birn co-owner Michael Kalman, and he told me that their hardbound books have been designed to open completely flat, and they have a flexible binding! Yep, that's right!

In order to achieve this, you have to break in the book before you use it by opening to the center of the book and bending the pages and covers back 360 degrees so they touch. Then go through the book and do that throughout the book, gently bending the pages and covers back.  I know you're thinking the whole book will fall apart. That's what I thought, and I would never in a million years have done it if he hadn't told me. But when I got off the phone with him, I went straight to the new S&B sketchbook I was about to start, and did exactly what he said. My husband walked in and was horrified --- he thought I was destroying the book until I explained it to him.

After bending the pages and covers gently all the way back from the middle of the book, I did the same thing from the center of each signature (where the stitching is). Then I again started from the middle, working toward the front, opening every page spread that way; then I did the same from the middle toward the back. Don't use every ounce of brute strength that you have, because if you try hard enough to pull the book apart, you will probably be able to do that!  When I was finished going through the whole book twice like that, every single page spread laid down flat. No deep gutters to cross! It was a miracle. I am sooooo excited about this! It works. Try it.

The reason why you want to do this before working in an S&B book is because if you paint across the two page spreads like I do, adding that flexibility to the binding reveals more of the white paper in the gutter area. If I were to do it to my almost-completed Alpha book, I'd have a white vertical stripe down the center of nearly every painting I've done in that book. I have noticed while working through the book that as it has broken in a little bit by itself, some of that white in the middle has been revealed on some of the page spreads. Not only will the books lie much flatter by breaking them in ahead of time, but it will also stop those white center areas from appearing later on as the binding gives with use.

The S&B hardbound books apparently have a triple binding process that involves three different types of adhesion. It is this triple process that enables them to undergo bending the binding and page spreads back that way without damage to the spine, and keeping all the pages intact. This is such wonderful news for those of us who work across the two-page spreads; I had to share!

Thursday

Tree Study


This tree study was sketched from my studio window with my Stillman and Birn 5.5x8.5" Alpha book. I used Caran d'Ache Supracolor II Soft pencils in Umber and White. I felt I needed to be able to go just a hair darker, so I added a Wolff's Carbon 6B pencil toward the end. These are all water soluble. I wanted to keep the water option open, but I decided I liked it the way it was, and only worked dry.

There is gold acylic paint added to the Sepia background color. You can see a bit of that shimmer where the light glare is in the photo. A little touch of that glow on the pages is a beautiful thing, but it's hard to capture in a photograph.

The little bit of white on the top left is a lifted-up sheet of glassine that I glued to the page to protect the pencil work, to keep it from smudging onto the facing page when the book is closed or somebody's leafing through the it. I realized that if I do more work in pencil, charcoal, or pastel (and I intend to), I'll need to have some small glassine sheets on hand to put over the work as I do it; otherwise some of those pieces would be ruined before I even got home from my sketching location. I can also use a sheet under my hand as I sketch with smudgy media, to prevent my hand from smearing the page. I went on an anti-smudge campaign!


Yep, I made an envelope as part of the book to store sheets of glassine. I keep a glue stick in my messenger bag with my sketching supplies, so gluing it in on location whenever necessary will now be very easy. To make this pocket, here's what I did:
  1. I knew this would take up extra space in the book, so to avoid bulging, I went to the very last signature in the book, and carefully removed the center page spread, tearing down the middle and removing both sides.
  2. I selected the two pages I planned to use to make each side of the pocket, and cut a semi-circle out of the top of the first page, to make it easier to remove the glassine. (To do that, I drew the arc, then put a cutting mat underneath the sheet, and cut it out with an xacto knive.)
  3. Using one of the pieces of paper that I removed from the book, I made a one-inch wide "tape" the height of the page, and folded it lengthwise with a bone folder. I did the same for the width of the page. Holding those two so that they overlapped on the lower right corner at a right angle, I placed them on a cutting board and made a 45 degree cut through all four layers. That way, when glued into the book, there would be no overlapping, and they would lie flat.
  4. I used a glue stick to coat the paper "tape" and the outside page edges, and glued it all together.
  5. I cut a 16x20" sheet of glassine into eight, 5x8" pieces, which fit exactly into the little envelope holder.
Voila! It's worked perfectly. The only thing I'll add is that when you glue glassine onto the pages, it's better to glue it from the side than from the top. The page curls at the top and bottom, so it's easier to lift the glassine from the side than it is from the bottom.