Showing posts with label palette layout. Show all posts

Friday

Update on the Makeup Kit to Painting Set Conversion


I've been enjoying my gouache paintbox that I converted from a makeup kit in my previous post, and have some updates for my readers. In this post, you'll find:

  • Solutions for issues that came up while using this box or a similar box. 
  • Link and photos of an available, relatively inexpensive makeup kit that will work well for those of you who have wanted to do something similar.
  • A couple of dollar store painting kit options to show you.

(If the full post with images does not appear below, click here.)

Wednesday

Makeup Kit to Painting Set Conversion


About five years ago, my daughter abandoned a makeup kit in the bathroom closet. It opened to reveal slide out trays with metal pans filled with eyeshadow, little screw cap pots for lip gloss, a mirror set into the lid, and even a small mascara tube. I have to confess that I coveted it from the first moment I laid eyes on it, hoping to someday convert it into a painting kit. The last time she came to visit, she gave it to me. Yes, I do wish I'd asked her sooner! 

(If the full post with images does not appear below, please click the post title above.)

Best of the Year, Part I


Happy 2013 to all my viewers! I'd like to start off the new year by sharing my favorite discoveries and new products of the past year. Some are new to the market, while others are things I'd just not explored before and hope to work with more in the year to come. I hope that some of you will enjoy using them too.

Today's post is about my favorite pigment of 2012: PR206. It is actually a Quinacridone red, but looks more earthy than many of the Quins. This pigment gives me a warm red, transparent earth color. It can easily be mixed with earthy yellows to yield the equivalent of a transparent red oxide. When mixed with ultramarine blue, it creates a dark, muted violet. I started using this color in my watercolor palette after taking a class with David Taylor. It became such a staple in my palette that I searched for the same pigment in oils and acrylics. The past few years have found me working transparently a lot more in both oils and acrylics, so this pigment was a natural fit --- especially for underpainting and glazing. I did several paintings using it as my only red. The pigment goes by many different names, so you need to look carefully for the pigment number, which is PR206.

Here are a few manufacturers that make it for different mediums.

Watercolor
Daniel Smith --- Quinacridone Burnt Scarlet
Winsor Newton --- Brown Madder

Oils
Maimeri Puro --- Avignon Orange
Daniel Smith --- Quinacridone Burnt Scarlet

Acrylics
Golden Fluid --- Quinacridone Burnt Orange
Golden Heavy Body --- Quinacridone Burnt Orange
Golden OPEN --- Quinacridone Burnt Orange


Click here to see Best of the Year, Part II.

More Watercolor and Gouache Palette Talk


Many people have been asking me about this watercolor palette over the past couple of days. I have explained in a previous post what I did, but perhaps that got overlooked because I didn't provide a photo of the actual conversion (above). When I bought this palette, it came with twelve half pans, secured in metal holders. I hated the paints. I took out those paints, replaced the colors with my favorite tube colors, and over the years have reconfigured it many different ways.  If you're interested in one of these, I've found the palette alone for a very reasonable price at Wet Paint Art --- click here.

I really like the size of this palette. It's small and portable, even when the flaps are opened up, and not too heavy for a metal palette. If you look at the image below, you'll see that you can not only fit half pans into two rows, but if you use the middle section (which is meant to hold brushes), you can fit a third row in there too.
For a long time, that's the way I configured this palette --- with three rows of paints, like the image below:


When looking for a way to incorporate my gouache pigments in the same palette as my watercolors, I needed more space. I removed the metal plate and clips that hold the half pans in the case. By doing that, plus turning all the half pans so they ran horizontally, I could fit in another entire row of half pans! Using just the outer metal case and removing the inside dividers also lightened the palette considerably. I secured the half pans in the case using the white tacky putty you can get at Staples or in craft stores to hold posters onto walls.

In the first photo at the top of this post, the bottom row of paint is gouache. You can read more about my pigment choices and this setup on this post. Remember that if you put watercolor and gouache into the same palette, you have to be sure to keep them separate when you mix your colors! Allowing the gouache paints to migrate into the watercolor pans will diminish the transparency of your watercolors. I use the bottom metal flap to mix my gouache, and that leaves the top two, larger mixing areas for my watercolors. Since I generally go from transparent to opaque (if I go opaque at all), I use the entire palette for watercolors, then just the bottom for gouache near the end of the process. I clean off the bottom mixing area before using it again for watercolor.

Thursday

Dogwood Blossoms

Image can be clicked for a larger version
6x18" on Stillman & Birn Beta paper
Watercolor

My favorite way to work in watercolor is to Just Do It. No pencil lines (or just a few for compositional guidance), no ink......Just straight in directly with a brush and pigment, getting as much down in a single pass as possible. There's something very unique about the way watercolor glows and jumps off the page when it's not fussed with. About six months ago, I ditched the non-transparent colors in my watercolor palette, and found that also made a huge difference in getting the paint and paper to give each other their very best.

That's not to say that I don't need to occasionally bail myself out with opaque lights like Cadmium Yellow or even Titanium White, or that I don't enjoy working with opaque color at times too --- especially on a toned surface. I do. But in restructuring my palette over the past six months, I decided to use gouache for that purpose. After all, if you need to go opaque, that's the way to do it. I took one of the Schmincke palettes that comes with two rows of half pans, removed the metal plate, and squeezed five (yes, five!) rows of half pans into it. Three of those rows were watercolor, and two were gouache. You may recall the post I did about that palette not too long ago. Here's my color chart from that set, as of last week:

It gave me a lot to choose from, but it proved to be heavy for hiking in the mountains. So last week, I pulled out my old palette, which is this one:


I discovered that by removing the metal plate and turning the half pans sideways, I could fit a fourth row into that smaller palette, and it's a lot lighter too. It was hard deciding which colors would stay and which would go, but this is the configuration I eventually ended up with:
 Yep, I'm down to one row of gouache, and kept three rows of transparent watercolor pigments. The dogwood blossoms sketch was one of my test drives for this new setup. So far, it seems to be working, and I'm happy with the lighter weight. Of course, when I need to travel super-light, I can always resort to the mini set I posted yesterday.

This is all a long-winded way of saying that as artists, our ideas continue to change, evolve, and come back around. It's all part of the fun of exploring our world of materials. What we work with depends on what we're painting, what we're painting on, how much time we have, what we're able to carry, and where we're going. And of course as watercolor painters well know, one can never have too many palettes! ;)

I know I promised a tour of my little red sketch kit for today, but I realized I need to take one more photo and do the image adjustment before I can write that post. It will come soon though!

Friday

Watercolor and Gouache are cohabitating in my palette!

Lexington Gray ink in a Lamy Safari fountain pen
Watercolor and Gouache
Stillman & Birn Epsilon 8.5x11" hardbound sketchbook

I finally found a way to set up my palette to fit watercolor and gouache together. I test drove it the other day and it worked fabulously well. A number of people have been asking me about this palette and how I did the reconfiguration, so here goes.....

I bought this palette online from Wet Paint Art Supply  in Minnesota. Apparently they are only made by special order, so Wet Paint ordered a bunch. Their customers liked them so much that they sold out almost immediately and ordered a lot more! The palette only comes with 12 colors (in two rows of six), with room for a third row of your own half pans and colors, for a total of 18. So, how did I transform this into something that will hold 32 half pans and one whole pan?

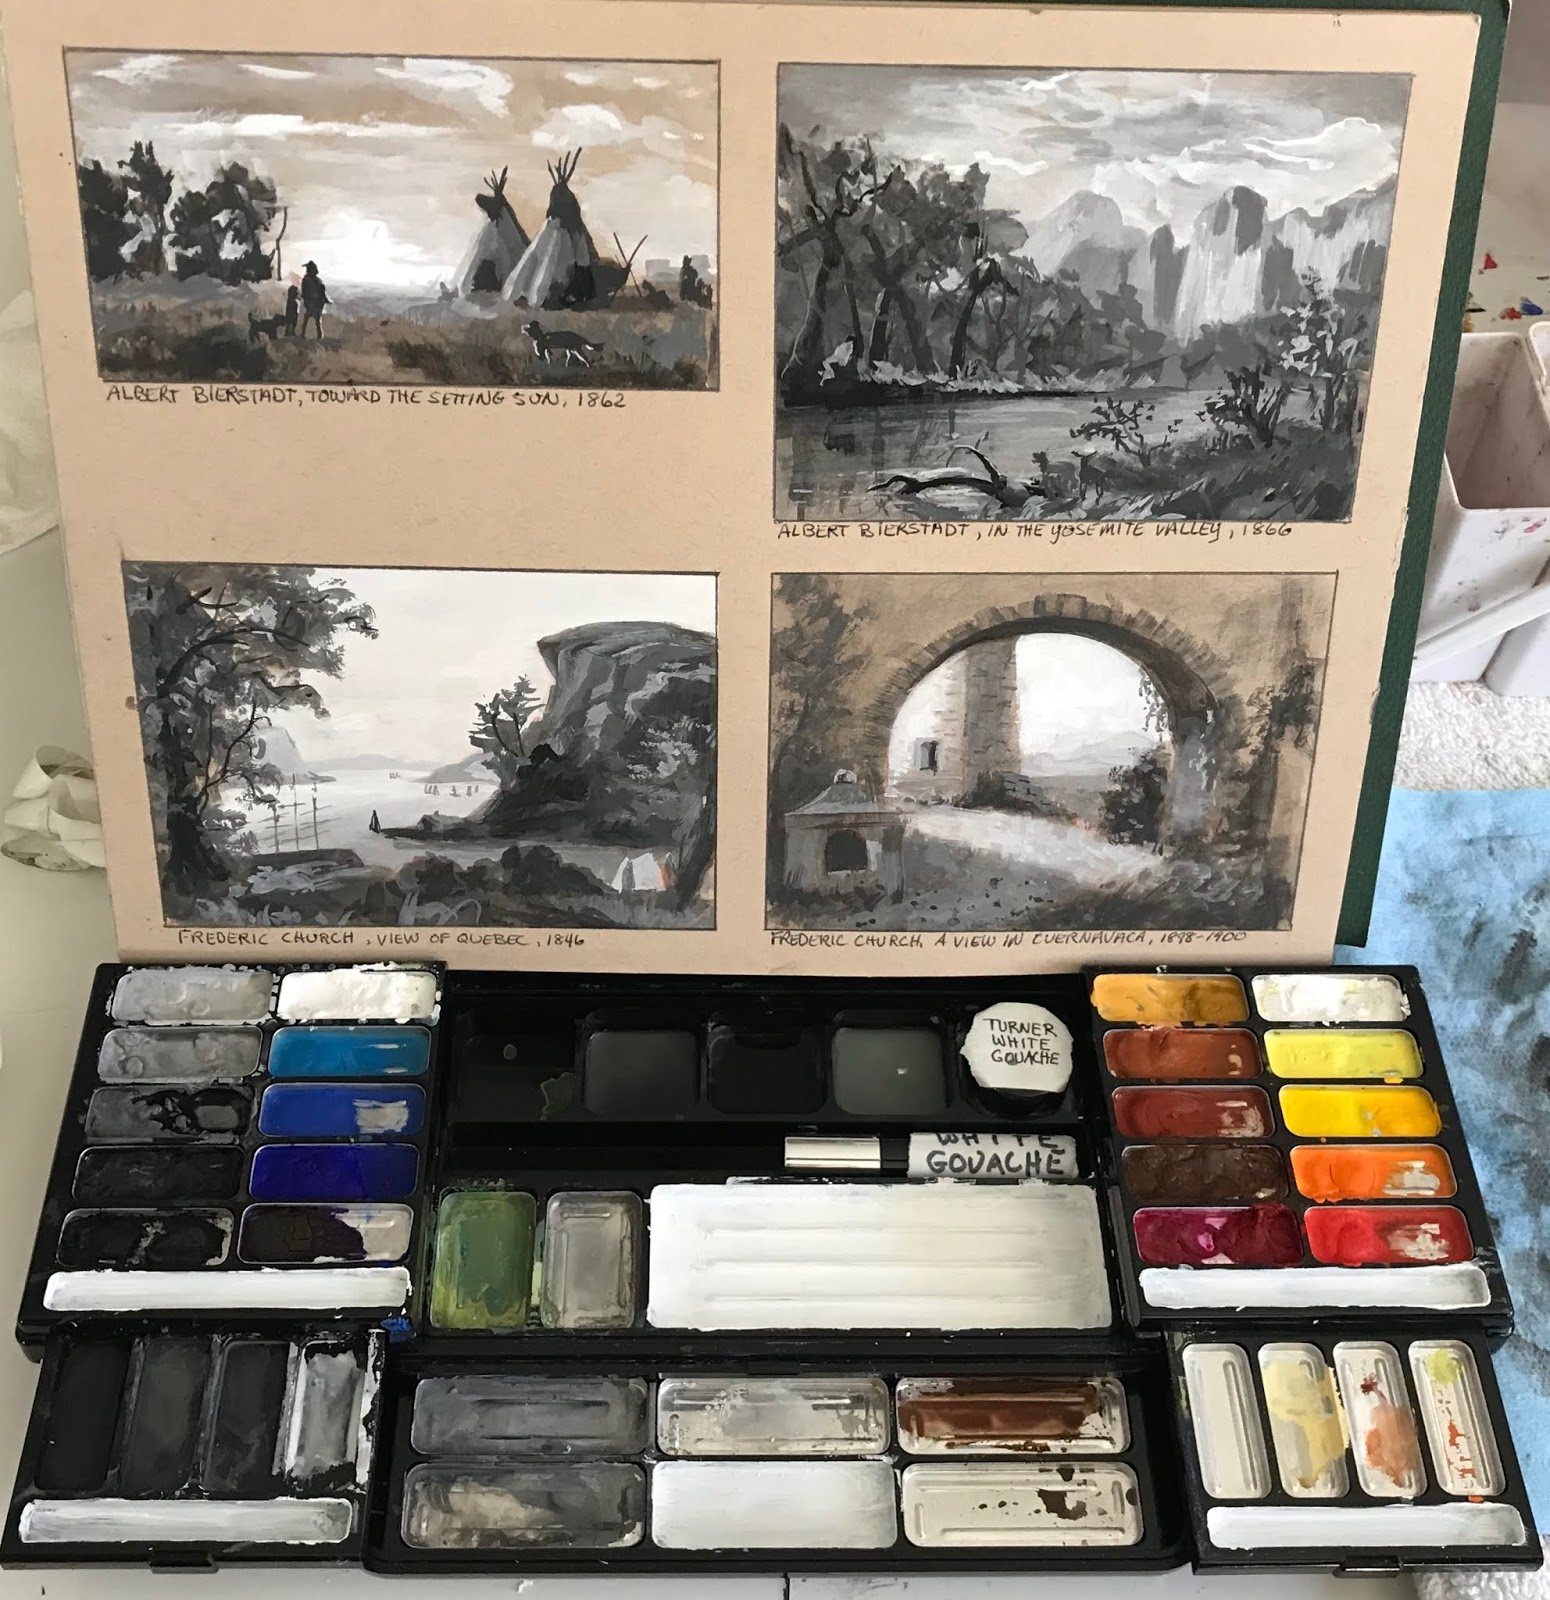
There is a metal plate with holders for the pans. It weighs a ton. I took that out. I fiddled with half pans in the empty space to see how many I could fit, and what the best configuration would be. I discovered that four rows of seven colors each would fit with the pans placed vertically,  but that I could squeeze in a fifth row if I had the pans run horizontally. In that last row, because of the curves on the corners of the palette, only five would fit. But I could fit a whole pan vertically in place of one of the half pans --- there was enough space to accommodate that. I am always needing extra white gouache when I'm painting with gouache, so I decided I'd keep my white in that one.

I took out a roll of adhesive magnetic strip. It comes rolled up like a roll of tape. I bought mine a long time ago and I don't remember what brand it was, but it looks something like this. I bought it in a craft store. I cut five strips that fit across the width of the palette. Since they were curled from being in the roll, I heated them with a hair dryer, which softened them a bit, and pressed them under a few very heavy coffee table books overnight. The next day, they were flat. With the adhesive side up (bare magnetic side down), I placed them in the palette, approximating where they would go.

I'd already decided which colors would go where the night before. I filled the pans that weren't already loaded, and wrote the names of the colors on each pan with a black fine point Sharpie. Starting with the top row, I peeled the paper strip off the magnet, revealing the adhesive, and stuck each pan down onto the adhesive strip, working across the row. I put in three rows of watercolor pigments (21 colors), then the 12 pans of gouache.

One thing about working watercolor and gouache together is that the opacity of the gouache, plus the chalkiness of white paint, can get into your transparent watercolor and destroy all that beautiful luminosity. This is why I always kept them in separate palettes. Since this metal palette has two sides, it keeps them separated easily. I'm used to having just two mixing areas for watercolor --- one for warm colors and one for cool. So the two sides of the top mixing area provide the wells I need. However, for gouache I need more areas, since I have to be able to mix value as well as color. All those little wells in the lower area are perfect for my gouache!

I was also able to eliminate the opaque watercolors from my palette. Usually I have cadmium red, a couple of cadmium yellows, cadmium orange, chromium oxide green, and a couple of other opaque watercolors in my watercolor palette. Now I can just substitute gouache when I need those, and keep all my watercolors transparent. That gives me an even larger color range than I had before.

I made the chart above so that I could keep track of what colors were in which pans, until I get to know my own system better. I also knew that initially, I'd be making some changes; that's why I numbered the pans on my sketch, instead of writing in color names. When I change a color, I can just change the name on the numbered list of pigments. I've already swapped out a few and shifted some around.

I've been looking for a way to do this for several years, but never found quite the right thing. This works for me at last!

Wednesday

Daniel Smith Watercolors and Palette Thoughts

New paints are so much fun! I got a bunch of colors from Daniel Smith last week --- some transparent yellows, as well as earthy reds and maroons. I also had to try their Blue Apatite and Moonglow, and Serpentine while I was at it!


I did some swatches and color comparision tests, and tried a few mixes, thinking about what might be effective for some new palette ideas I have.


I pulled out Craig Nelson's book, 60 Minutes to Better Painting. He has so many great ideas in there, and some interesting palettes too. I was admiring his analogous palette paintings and decided to put together a few analogous palettes to try out. I had some extra kids' watercolor sets that I'd popped the pigments out of. These tiny palettes are wonderful for trying new colors and ideas. I set three of them up as analogous palettes --- one red, one yellow, and one blue. That means that the entire painting should have that color in it, so for example, the blue analogous palette would have blue, a blue-green, a yellow-green, a bluish violet, and a reddish violet. The complement is used only to dull the colors, so although there would be an orange in the blue palette, it would be only for mixing purposes. Here are the three palettes and some test swatches I did:


The next day, I went to Adams Fairacre Farms in Wappinger NY. I decided to test drive the blue analogous palette in the greenhouse.

In the end, I couldn't resist adding the yellow flower centers, and I realized that an analogous palette is probably not the best choice for a flower garden or greenhouse! When I got home, I wanted to try it again, so I set up a still life and did a quick color study.

I'm afraid that for me, the jury is still out on this. Maybe I'm just not fond of all those cool colors, or maybe I like the pop of the complements too much for this limited approach. I haven't tried the red or yellow analogous palettes yet, but plan to do so soon. In the meantime, I'm going to let the color junkie in me have a little fun with some full color!

Note: The sketches above were done in a 5.5x8.5" Stillman and Birn Epsilon hardbound book. The color samples were done in an S&B Epsilon 8.5x11" hardbound book.

Friday

Mini Muted Palette

Stillman & Birn 5.5x8.5" Epsilon Hardbound sketchbook
Watercolor, Noodler's Lexington Gray ink in a Lamy Safari

I had an extra mini kids' watercolor palette lying around, so I decided to use it for a limited palette. I chose an assortment of seven muted colors (since there were 8 spaces for paints after popping out the ones that came in the set), plus the white gouache that I always carry along "just in case". But then I thought, "Gee, seven colors plus white is really not a 'limited' anything!" Although I titled it Limited Palette because it's a range of muted colors, that's a term that us usually indicative of not only muted colors, but also just a few of them!

I played with mixes and made some determinations regarding what I want to keep and what I'd like to swap out for something else. The colors listed are a starting point, and I expect this palette will be an evolving exploration. I've already ordered some new colors to replace a few of these. I've been looking forward to using a group of mostly warm colors like these on lightly toned paper --- ivory or peach or some other warm tint. I am really loving the olive greens I'm getting with the Quinacridone Gold and Paynes Grey.

My new watercolor palette and layout


I got this beautiful, new Schminke watercolor palette! It folds up nice and small, and is pretty easy to travel with. I decided that I wanted a setup with more colors that was still easy to cart around. It's a little larger than the palette I was using before, and I had to make a new sketchboard to accommodate the extra width. It came as a three row palette, but my husband trimmed a bit off the metal plate base so I could slide it up and squeeze in an additional row of half pans.

I also changed my color layout. It looks a little haphazard, but there is a method to my madness! In the top two rows, I put the opaque colors on the left, the transparents in the middle, and the earth colors over to the right. It's really helped to avoid mistakes between colors that look similar in the pans, but have completely different properties. The bottom row contains seasonal colors that will rotate, or exotic hues that I only use occasionally, colors I'm test driving, or colors that are easily mistaken for something else. (Quinacridone Gold is in that row because when it was in the yellow row, it looked so similar to Winsor Newton Raw Umber in the pans that I kept diving into it at the worst possible moments!)

The painted color chart was done so that I'd be able to remember what was in the set in terms of both color and brand. Some colors are completely different in different brands. That seems to be especially true with Raw Sienna and Raw Umber! I realized that if I wanted my mixes to be consistent, I'd have to be consistent in brands too, or at least test drive mixes in advance when trying new brands, so I can avoid some surprises when out painting on location.