Showing posts with label Stillman and Birn Zeta. Show all posts

Wednesday

A Day at the Farm

11x17" (across the spread) in a Stillman & Birn Zeta Sketchbook
Background monoprinted in several layers with a Gelli Printing Plate

My plein air group went to Green Chimneys today, which is a residential facility for children. Their philosophy is that children benefit greatly from caring for and interacting with animals. They have a wonderful farm on the campus. Many of the animals here have been rescued and are in the rehabilitation process, not so unlike the children that reside here.

It was over 90 degrees today, and you'd never know we were into September. Due to the heat and my love of the animals, I decided to spend the few hours there sketching instead of working on a single painting. Of course the animals were in constant motion, so the sketches were gestures, done as they moved about. The sketch above (which you can click on to enlarge it), was actually the last one of the day. It was done across a two page spread of an 8.5x11" Stillman and Birn Zeta hardbound book, which gave me a full 11x17" work area. This is extremely heavyweight paper (180lb) and is fabulous for multi-media work. I've been using a large Gelli Printing Plate to print textured layers of color across the pages. I've done it in both Zeta and Epsilon books. I love having a toned, textured ground to sketch against, especially when working in monochrome. I sketched with a Faber Castell Pitt Calligraphy Pen. I wished I'd brought a bunch of Pitt Brush Pens with me, but alas, I did not.


Above is a two page spread in a smaller Zeta book, without a toned ground. The book is 5.5x8.5", which gives me a letter-size space when working across the spread. When we first arrived at the location, we gathered near a small pond filled with several different types of ducks, geese, and some beautiful swans. They were all highly entertaining! I started out with the little watercolor thumbnail sketch of the pond scene, then did some gesture sketches of the geese and swans, using the same Walnut Brown Calligraphy Pen, and a little watercolor.


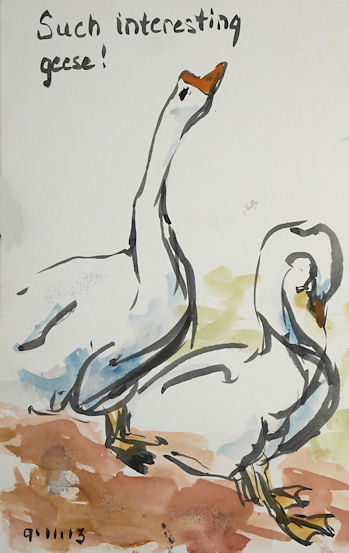
I got tired of the brown and wanted to work with a brush, so for the sketch above, I pulled out a Pentel Aquash Grey (or maybe Light Black?) brush pen, plus my Kuretake brush pen, which was filled with Platinum Carbon Black ink. I added orange gouache for the beaks and cerulean blue watercolor for the shadows. I liked these two gestures. The goose on the left kept ducking his head down into the water to drink, then would raise it way up. Every time he stretched his neck and head up, I put in a few more lines!


11x17" across the spread, Stillman & Birn Zeta Hardbound book
Golden Fluid Acrylics background, printed with a Gelli Plate
Sketch done with Golden High Flow Acrylics

My friend Bea called me over to the other side of the pond to witness some swan antics. One kept swimming back and forth in front of me. I found this page that I'd printed using paper doilies on the printing plate to keep some clear areas, and decided to put the swans there. I worked on several views at once, changing from one to the other as he changed direction, swimming around in a circle. I mixed a violet out of some of the new Golden High Flow Acrylics, using Ultramarine Blue and Quinacridone Red, and did the sketches directly with a watercolor brush. The orange is Pyrrole Orange, a color I am becoming quite addicted to!


Monday

Sketching at Kaaterskill Falls


(Click image for a larger, clearer view.)

A few days ago, I hiked up to the base of Kaaterskill Falls with some friends for an hour or so of sketching. I had previously done a multi-layered monoprint across this two page spread in my Stillman & Birn Zeta hardbound book. The little picture area borders were printed at that time (and later embellished with markers), so I used them to make vignettes of scenes at the falls. The first one, on the upper left, is the grand view of Kaaterskill Falls, which is the tallest waterfall in New York State, and appears in many Hudson River School paintings. The little round sketch to its right is a rock study. Rocks give me a wonderful way to examine how value and color change as the form turns toward and away from the light. The third little sketch (the oval) is my friend Athena, who was sitting next to me painting the falls in watercolor. The last tiny sketch is unfinished, because everybody was packing up to go at that point. I tossed all my stuff into my backpack and we hit the trail! These were all done in gouache over the acrylic background.

Sunday

Sketching Boats with a Figure 8


I often practice sketching items from photos that I have to be able to pop into plein air paintings quickly. This includes figures, boats, bicycles, cars, trees, rocks, etc. One rainy day, I decided to do some boat sketching. I first searched YouTube for any new tips on sketching boats, and came across this interesting video on how to make boats from a figure 8.


I pulled out my S&B Zeta Hardbound sketchbook and selected this page spread, which I'd monoprinted in several layers across the spread. (You can click here to go to the post where I explained how I did this.)


I started the page spread by experimenting with the figure 8 boats in the video, facing them in different directions. I tried them slightly larger and slightly smaller, varying the sizes and widths of the loops to find what would work best. What I found was that the figure 8 boat sketches are fun and kind of interesting. But it wasn't long before I saw that it only gave me a certain amount of perspective variation and boat angles, and applies to very few cases of actual boats I'd be painting. However, it did give me a feel for roundness and overall shape that I found useful. Once I'd gained what I found to be helpful from the video, I did some larger boat sketches from photos that encompassed other angles and drawing approaches. I'll probably add a few more to this page spread the next time I want to practice sketching boats.

Tuesday

Monoprinting in a Sketchbook Part 2 --- Plein Air Monotypes

11x14" Monotype print across the two page spread
of an 8.5x11" Stillman & Birn Zeta hardbound sketchbook

After spending some time doing the prepared backgrounds in my sketchbook with the Gelli Printing Plate, which I showed in Part I, it was time to explore more painterly monotype prints. After a few rainy days, a gorgeous day finally arrived, and I was too exhausted to head out to paint on location somewhere. I wanted to stay home. I brought all my gear out to the patio for an afternoon of plein air monoprinting. I was excited about trying this across the two page spread of my sketchbook, like I'd done the backgrounds. As you can see, it worked out fabulously well and printed right up to the gutter on both sides. As I stated in Part I of this monoprinting series, it would be ever so much better if they would make the plate size 11x17, rather than 12x14!

I set out a folding table and covered our patio table, and prepared for an afternoon of relaxed image-making. 

One of the tricky things about monotype prints is that when you paint on the plate, you need to create your image in reverse. The image will flip when you press your print. (This is especially important if you are creating text!) This was all so new to me, and I had a hard enough time wrapping my head around the whole technique of getting the paint onto the plate in a way that would transfer well. I decided not to worry about the reverse images for now, and allowed my landscape to reverse itself when I pressed the prints.

For these monotypes where I painted with brushes on the plate, I used Golden Open Acrylics. I had tried it the day before with the traditional Fluid acrylics and found that even though the fluids worked well for me when doing the textured backgrounds, they didn't give me enough working time for painting with brushes. Monotype printing is a somewhat subtractive process, so you need to not only be able to put paint down, but also to lift it off to reveal the white of the paper when the print is made. You need to think like a watercolor painter in getting lights down and working transparently, and like an oil painter in layering and removing color. It certainly keeps you thinking!


Later in the day, I moved over to the other side of the patio so I could take advantage of the view off the other side. I didn't like this one as much as the other, but I learned a tremendous amount from both of them, and look forward to further exploration of the monotype process. Generally speaking, it would be hard to do this plein air when traveling to locations, but definitely not impossible if you use a smaller Gelli plate and work in a smaller size. (You can see the wheels in my brain turning, can't you?)

Are you intrigued? Well, then definitely give these Gelli Printing Plates a try! They're inexpensive and a lot of fun. They give interesting effects and force you to think outside of the box --- always a good thing! If you have Stillman & Birn sketchbooks, you can take full advantage of their ability to open flat so you can print across the spread. Creating a sketchbook of monoprints is an exciting endeavor!

Monday

Monoprinting in a Sketchbook Part I

There's been a lot of buzz out there lately about the new Gelli Printing Plates, which enable artists to use traditional acrylics to create monoprints inexpensively, and without a press. I had to get on board that train! I ordered the largest size available, which is 12x14". As soon as it arrived, I dove in. My goals were to create textured backgrounds for artwork using monoprinting techniques, as well as traditional painting on the plate to directly monoprint a work of art.

I spent a couple of days creating all sorts of effects and exploring techniques. I used brayers, squeegees, textured surfaces of all kinds, stiff and soft paintbrushes, fingers, paper towels, Q tips, color shapers, put on paint and pulled out paint. I worked multiple layers on many different types of papers, and well as single-layer, brush-painted monoprints on good printing paper. I used fluid acrylics, Golden Open acrylics, and assorted mediums. I tried some interference paints, iridescent paints, and sprayers. Here are some of my more interesting results. (Believe me, with all that experimentation, there was a lot that wasn't worth sharing!)

I've always loved sketching on a prepared ground. I often pre-toned my sketchbook pages, or layered on textures using assorted tools. I've seen many YouTube videos where artists monoprinted the full sheets of paper, then  made sketchbooks out of it to get the prepared grounds. Other videos and blog posts showed printing in a hardbound book, using one side of a page at a time. The problem with either of those methods is that the left and right sides are from different prints, so they don't match. I almost always work across the spread in my hardbound sketchbooks, so that approach was not going to work for me.

Stillman and Birn to the rescue! Because their hardbound sketchbooks are designed to open flat, I thought they might enable me to print right across the spread. I opened up the book and pressed it flat down against the printing plate. And guess what. It works! Furthermore, since I was printing the background and not painting it, I didn't have problems of paint running into the gutter of the book and discoloring other pages.


Above is an 11x17" page spread of an 8.5x11" Stillman and Birn hardbound Zeta book. (It's about four layers of prints.) These new smooth surface books with heavyweight paper are ideal for monoprinting. Who knew! These will be fabulous backgrounds to paint and sketch on now.

The Gelli plate yields a great ghost image too, so it's worthwhile to have paper ready to take the second image. I decided to see if the lighter weight Epsilon books would also print well. I broke one in to be sure the spreads would lie flat enough, and started alternating between the books. That way I could get the most from my colors and textures. Below is the Epsilon spread with the second printings of some of the colors. (I don't know why it's showing sideways, but if you click the image it will right itself and enlarge.)


Below is one of my personal favorites. It was done as two printings --- the first with diluted Cerulean Blue, and then a layer of Transparent Red Oxide mixed with a little Iridescent Copper. It has a very subtle sheen, which is not visible in the digital image.


This one also has iridescent paint, and a few layers:

I'm looking forward to working on these prepared pages soon!

Why the Gelli Printing Plates are made in sizes 6x6", 8x10" and 12x14", I'll probably never know. Paper is sized 8.5x11, 8.5x17, and 11x17, or in the fine art full size sheets of 22x30 (which quarters to 11x15, and 1/8 would be 7.5x11). Therefore, the Gelli Plate sizes do not allow full use of plate nor paper. This is why there are side stripes on some of these page spreads that I printed. I tried to make the best of it. I kind of like them, and I can use them for writing text. For some of the page spreads I printed all the way to one edge, allowing the print to overlap the gutter and leave me with about 3" of unprinted space on the opposite side. Then I could either print that space separately and use it as another graphic block, or I could use it for text to accompany whatever artwork I ended up doing across the spread. I didn't take photos of those yet, so I suppose those will make their debut once the artwork is done over the top of the backgrounds and they become finished pages. However, I wish I had the option of printing across the full two sketchbook pages, and I also wish the plate would accommodate the standard 1/4 sheet size of 11x15 when I use rag paper. The awkward 12x14 plate size misses the mark on both.

Click here to go to Part 2.

Courtroom Sketches


I was sitting in on a court case today and had my first-ever opportunity to sketch in a courtroom.  I arrived a few minutes before the first case was called, so I did the quick sketch above to feel out the lay of the land and get my bearings. I used a Pentel Gray Aquash brush pen for all of my sketching today. The sketchbook is one of the new Zeta hardbound books from Stillman & Birn. Going right in with an ink-filled brush is really my favorite way to go about this kind of thing, especially on this smooth Zeta surface. The two facing pages of this spread had been slightly toned with a warm-colored watercolor wash several days previously. I laid in a bit of color after I got back home just to liven it up a little.

This was the Albany City Court building. I wouldn't have minded an entire day there just to sketch architectural elements. The hallways were filled with magnificent marble arches and a central winding marble stairway. This courtroom had exquisite woods with intricate carvings, which of course I didn't have time to render.


The proceedings got underway, and I got to experience at least a little bit of what courtroom artists are up against when they are trying to capture a scene amidst a cast of changing players. I have to say, it was really a lot of fun to do this, though I'm not sure I'd want to do it under the kinds of pressures that the courtroom artists endure. There are lots of things I'd plan differently the next time around, such as leaving spaces to put in figures that would move into various positions in the room, then pop them into those spots as the situations present themselves.

This second sketch was done over a blue wash, which was a little bit dark in terms of being able to present my light values. That's something I'll have to take into consideration next time, especially if I plan to use watercolor over it. I resorted to a little white gouache to reclaim some lights, like on the table tops. It also would have been nicer to work a larger size for this; however, I was trying to remain inconspicuous, so the double spread of a 5.5x8.5" book was perfect for a few minutes of stealth sketching.


Tuesday

New Product Review --- Introducing Stillman and Birn Zeta


If you're a fountain pen aficionado, sketch with ink and dip pens, love Pitt Brush pens, or the coverage you get with colored pencils on smooth paper, or mixed media on a plate-like surface of extra heavy-weight paper, you're going to adore this new Zeta paper from Stillman & Birn. Think of their fabulous Epsilon surface in a thicker, more opaque version, and you'll have a pretty good idea of what this paper is all about. When I first tried the Epsilon paper, I loved it so much that I wanted an even thicker version. Now it's here! Many thanks to Stillman & Birn for making my dream come true.

I was sent some 8.5x11" sheets of the Zeta by Stillman & Birn when it first came in from the mill in France. When I first saw and felt the Zeta paper, there seemed to be such a world of possibilities for media that would work well on it, that I didn't know where to begin. I wanted to do a sketch that would showcase the potential of this smooth, slick surface. I did a few sketches in watercolor and ink of flowers, pitchers, vases and fruit, and played with assorted inks and washes. Then I decided to sketch some of the materials I'd like to use on this paper, which became the inspiration for this particular sketch. I tossed some of my favorite pens, brushes, markers, crayons and pencils into a brightly colored little pot that I normally use for my painting water, and set out some paint tubes as foreground elements.I felt the colors in the setup were strong enough to carry a strongly colored ink. Noodler's Black Swan in Australian Roses is one of my favorites. It is not lightfast. It is not waterproof. But there is something magical about the color, so I keep a wonderful Sheaffer 100 loaded with this ink, and it is always with me. I like the way this ink weaves the color harmony of the sketch together. I started this sketch with a few pencil lines, then went right in with ink and did the drawing, working mostly front to back. I used a wet brush to create some wash effects with the ink in shadow areas, followed by the watercolor. The last step was putting in small ink details, like some of the writing on the paint tubes, which would have run if I'd done it earlier in the process. I accidentally did this sketch on the reverse side of my sheet of dark ink test swatches, which proved to be a testament to the high opacity of this paper; no ink lines showed through at all!

The way the internal and external sizing of the paper permits the paint pigment to lie on top of the page yields a wonderful brightness in the color. The pigment does not spread out and mix together like with traditional watercolor paper, so it does take some getting used to and adapting. I'm really looking forward to breaking out my gouache on this paper. I think it will be a great match. The sketch below was done with transparent watercolor and just a bit of white gouache toward the end for the lights. But actually, the sizing allows for pretty easy lifting of pigment, so I probably could have reclaimed those lights without adding white. This sketch is 8.5x11.


I also did a sketch with an ink that I know to generally be very waterproof. Since waterproof fountain pen inks are at least partially challenged by heavy sizing, I wanted to find out if Noodler's Kung Te-Cheng would run when I added watercolor. It's one of my favorite inks, and I wanted to be sure it would stay put on this paper, no matter what else I did to it. Well, as you can see, the ink did not run at all. The sketch below was done while visiting with my friend Gingie at RiverWinds Gallery in Beacon. They have so many beautiful displays there that it's a fun place to break out a sketchbook! This one is also 8.5x11"on the Zeta paper, using a Kaweco fountain pen with a broad nib and transparent watercolor.


There is so much more to explore with this paper. I can't wait to have it in sketchbook form. Finally there is an ink-friendly paper that does not show through to the other side at all, so there will be no ghosting of images when working front and back on the pages. If you enjoy working on smooth paper, this is definitely one to check out. I know I'll be going through a lot of it. If you would like to also read another artist's review of this paper, check out this post by Jeanne Powers-Forsyth.