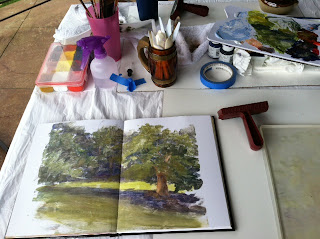
11x14" Monotype print across the two page spread
of an 8.5x11" Stillman & Birn Zeta hardbound sketchbook
After spending some time doing the prepared backgrounds in my sketchbook with the Gelli Printing Plate, which I showed in Part I, it was time to explore more painterly monotype prints. After a few rainy days, a gorgeous day finally arrived, and I was too exhausted to head out to paint on location somewhere. I wanted to stay home. I brought all my gear out to the patio for an afternoon of plein air monoprinting. I was excited about trying this across the two page spread of my sketchbook, like I'd done the backgrounds. As you can see, it worked out fabulously well and printed right up to the gutter on both sides. As I stated in Part I of this monoprinting series, it would be ever so much better if they would make the plate size 11x17, rather than 12x14!
I set out a folding table and covered our patio table, and prepared for an afternoon of relaxed image-making.
One of the tricky things about monotype prints is that when you paint on the plate, you need to create your image in reverse. The image will flip when you press your print. (This is especially important if you are creating text!) This was all so new to me, and I had a hard enough time wrapping my head around the whole technique of getting the paint onto the plate in a way that would transfer well. I decided not to worry about the reverse images for now, and allowed my landscape to reverse itself when I pressed the prints.
For these monotypes where I painted with brushes on the plate, I used Golden Open Acrylics. I had tried it the day before with the traditional Fluid acrylics and found that even though the fluids worked well for me when doing the textured backgrounds, they didn't give me enough working time for painting with brushes. Monotype printing is a somewhat subtractive process, so you need to not only be able to put paint down, but also to lift it off to reveal the white of the paper when the print is made. You need to think like a watercolor painter in getting lights down and working transparently, and like an oil painter in layering and removing color. It certainly keeps you thinking!
Are you intrigued? Well, then definitely give these Gelli Printing Plates a try! They're inexpensive and a lot of fun. They give interesting effects and force you to think outside of the box --- always a good thing! If you have Stillman & Birn sketchbooks, you can take full advantage of their ability to open flat so you can print across the spread. Creating a sketchbook of monoprints is an exciting endeavor!
.JPG)
.JPG)
.JPG)
Jamie -- Have you tried these plates with either watercolor paint or gouache. They sound fun but I am not keen on having to buy acrylics.
ReplyDeleteJan
Jan, water beads up on the Gelli plate, so watercolor would not work. I did not try gouache, but I suspect it will not adhere. However, I do have a suggestion for you. Buy Golden Acrylic Glazing Liquid, and mix it in with your watercolor or gouache. Essentially, you will be making your own acrylic paint. Use the Glazing Liquid instead of water to dilute your paint, and I think it will work!
ReplyDeleteBest wishes,
Jamie
Thanks, Jamie! If you try the Glazing Liquid and it indeed works with the wc and the gouache, be sure to let us know. I appreciate your advice! As always.
DeleteJan