Showing posts with label Gouache. Show all posts

Saturday

Sea Ravens and Wolfish from the Maritime Aquarium

Stillman & Birn 5.5x8.5" hardbound sketchbook
Golden Black Gesso
Golden Interference Fluid Acrylics
Gouache
Sakura Gelly Roll pens

This sketch was done on another spread with a background prepared in the studio in advance. The sketch itself was done on location at the Maritime Aquarium in Norwalk, CT. The gouache stood out pretty well against the black and iridescent surface, and the metallic Gelly Roll pens were the perfect defining touch for these eerie creatures of the deep!

Friday

Golden Black Gesso and Sakura Gelly Roll Pens


This was so much fun! (Image can be clicked for a larger, clearer view.) I used Golden Black Gesso to coat a few page spreads in my Stillman & Birn 5.5x8..5" Epsilon hardbound sketchbook, drying each with a hair dryer before going on to the next. One coat of the Golden Black Gesso perfectly coated the paper. I did try a couple of different dilutions of it also, but it was best right out of the jar the way it came. It applied a thin, totally opaque covering of the paper with a single coat. I used an inexpensive foam brush.

Then I diluted some Golden Fluid Acrylic Interference paints in spray bottles, using a little airbrush medium, flow release and water, and spritzed each page spread with a couple of different colors, drying them again with the hairdryer. I did this in preparation for a sketching trip to the Maritime Aquarium in Norwalk. They have a few very dark rooms with extremely interesting things and flourescent lighting, like jellyfish! This page in the book almost exactly mimics the dark, flourescent tank they were in. I grabbed a handful of Sakura Gelly Roll pens, purchased at a Jerrys store on my way to the Aquarium, and went to town with them.

The Gelly Roll pens worked fabulously on the gesso and the paper. They are very opaque, bright and smooth. I am going to get more!

Here's what the Sakura Gelly Roll pens that I got look like on black and on white. On the white paper, I brushed over the crosshatched sections with a waterbrush to see which ones will wash and which are waterproof.


That first sketch was fun, but it didn't give me exactly what I wanted. I turned to another black/interference page spread, and this time used gouache with some Gelly Roll pens over the top. I was much happier with this one!


This is something that I definitely want to spend more time exploring in the weeks to come!

Saturday

Copper Weathervanes at Adams Fairacre Farms and more glittery stuff

You can click this image for a larger, clearer view
Stillman & Birn Epsilon 5.5x8.5" Hardbound Sketchbook
Collage, ink, gesso, and acrylic background
Private Reserve Copper Burst ink in a Pilot Petit fountain pen
Noodler's Midnight Blue ink in a Kaweco Sport EF fountain pen
Watercolor
Schmincke Dry Copper Gouache

I have the most challenging time adjusting these iridescent images. The copper is really stunning, but in a photo it looks dull and brown without the shimmer of the light on it. If you can imagine the shimmer that you see in spots, spread throughout areas of the sketch, you'll have a better idea of how this looks in real life. The border and box shadow are copper iridescent acrylic, and there's a light coating on the multi-layered page background too. In fact, that background has eight layers of assorted media on it! If you click the image, you can see through parts of it to various background layers of patterned ink and shapes.

I was sketching at Adams Fairacre Farms in Wappinger, NY this past week. I had prepared several page spreads in advance, including this one with the copper background. When I walked by a display of large copper weather vanes, I knew I'd found the perfect subjects for those pages! Combined with my love of birds, it was irresistible! I sketched them with Private Reserve Copper Burst, added some Noodler's Midnight Blue for contrast, and blended/shaded a bit with a waterbrush.

I loved the Schmincke Reichgold Dry Gouache so much that a couple of weeks ago, I got three more jars of different colors:

This was a perfect opportunity to dip into the copper version, so I mixed up some of that after I got home, and added it to areas of the weathervanes, and painted the page title with it.

Tuesday

Wedding Flowers

My first big event of 2012 was my niece's wedding! She got married on New Year's Day, so we spent a few days in Maryland to take in the festivities. The table bouquets were white hydrangeas, assorted yellow flowers, and peacock feathers. I got to take one of them back to the hotel with me and sketched it that night during the first half of the Giant game, while the guys cheered on our home team. Even I gave in and watched the second half. Some things are a requirement!

The feathers had so much sheen to them that after I finished painting, I mixed up some of the Schmincke dry gold gouache and added some sparkle to them. Unfortunately, that isn't visible on the photo. However, you can see the coppery shimmer on the border from the iridescent acrylics that I used to prepare the page ground and border.

Inks used: Private Reserve Copper Burst and Private Reserve Sepia
Pens: Pilot Parallel 1.1mm, Pilot Petite
Winsor Newton and Daniel Smith watercolors
Winsor Newton, Schmincke and Holbein gouache
Pages prepared in advance using Golden Fluid and Golden Fluid Iridescent acrylics, and F&W Acrylic Inks
Painted across a two page spread in a 5.5x8.5" Stillman and Birn Hardcover Alpha sketchbook

Friday

Review of Schmincke Reichgold Dry Gouache --- Glittery Glimmery Glam!

(Image is clickable if you'd like to see it larger and sharper.)

When I got home from Adams the other day after doing this sketch, I did the writing with the same pens and inks that I used on the sketch posted yesterday. But it seemed a little stark to me. It needed just a touch of something glittery for some extra holiday cheer. I was going to add some gold touches with the Krylon 18K Gold Leafing Pen, but then I got another idea...

A few weeks ago, I was in the Jerrys Artarama store in Norwalk, and I stumbled upon a bottle of Schmincke Reichgold Dry Gouache. It's metallic gold with a gouache binder in powdered form that you mix up as needed. I had to try it! It's been sitting in my studio ever since. I pulled it out and using a small palette knife, set some out on a piece of glass. I took a couple of drops of water and mixed it up with the palette knife on the glass surface, then painted some bits onto the wreath. I know you might only be able to make out a few dabs of it on the wreath; it's hard to see in photos, just like the iridescent paint, but I absolutely love this stuff! I wish you could all see it in person. It mixes up very easily and has a more textural look to it than the pen. When you mix it, you can understand why it is sold in a dry, powdered form. The metal particles separate easily from the water and binder once it's mixed up, so liquifying it as needed is definitely the way to go with this product.

Here's what the bottle and powder look like:

The photo makes the bottle look huge, but it's only 20ml. Very small. The mix remains soluble in water. I left  some to dry on the glass, then went back with a wet brush and it sprang right back to life. The small quantity I'd put out was just begging to be all used up and it reconstituted so easily that I went ahead and added it to some other sketches too. Some does come off after it's dry if you rub a finger across a painted area, so it doesn't set as permanently as the gold pen or gold acrylic paint.

The fact that the gold gouache remains soluble is a big factor, because that means it won't destroy my brush if I'm out on location and can't wash the brush right away. Although the gold leafing pen is easier to carry around and use, the gouache has some advantages. I can use more water and less powder to add a little shimmer to a colored area, or  instead paint something solid gold with very little dilution of the product. This makes it more versatile in its application. Apparently it can also be mixed into paints, though I haven't tried that...yet! 

Thursday

Returning to Adams Fairacre Farms

I had so much fun the last time I sketched at the new Adams Fairacre Farms in Wappinger that I couldn't wait to get back there for Round 2. They must have sold a huge number of poinsettia plants, because the huge tree of them that I sketched last time was gone!

I started out the morning in their greenhouse again, sketching with Noodler's Sequoia ink and watercolors in a fine-nib fountain pen, in my Stillman & Birn Alpha 5.5x8.5" hardbound book. Because of the fairly intense color of the prepared background, I ended up switching to gouache to finish off the sketch. I always make sure to have gouache with me for emergencies like this. Since I like to travel light, I made a tiny gouache kit from a mini Altoids container and Sculpey clay.

 The holes in the clay were made with the back of a pencil. (That and the quarter should give you an idea of how tiny this is!) I was able to make 15 holes for colors. Since the Altoids tin is metal, I baked the whole thing in the oven, Sculpey, tin and all. Once it was cool, I coated the inside with a few coats of Golden GAC 100 to seal it. I'm not sure if that step was necessary or not, but since I had it on hand, I went ahead and did it. I've been using it for several months now, and it's really come in handy on a number of occasions.
The smaller text on the page was written with a 1:1 dilution of the Sequoia ink in a different, broad-nibbed pen. (A Kaweco Sport) Sometimes it just seems too saturated to me for writing, and I happen to like the more olive-like green I get when I dilute it. You can see the difference in the value and color between that green text, and the thinner, darker green of the lines for the hanging baskets of plants. The page title was written with a 2.4mm Pilot Parallel, using a red Pilot ink cartridge. Having a red calligraphy pen all set to go has turned out to be a good thing during the holiday season!

Tuesday

Sea Life from the Coral Reefs

(Click image if you'd like to see a larger version.)

This two page spread in my Stillman and Birn Alpha Hardbound sketchbook was prepared in advance using Fluid and Iridescent Fluid Acrylics. It was exactly what I was looking for to capture some small sketches of different tanks as I passed by. There was quite a bit of acrylic on the surface here. I didn't think watercolor would take well enough to it, nor provide enough variation in terms of light colors, so I used a tiny gouache set that I made out of a mini Altoids tin and Sculpey clay.

I came upon a huge tank of jellyfish lit from above in a very dark room. I was almost hypnotized by their beautiful floating, changing shapes and subtle coloring as they glowed in the light. I used white gouache against a dark golden-colored background, but felt it wasn't quite dark enough. When I got home, I darkened around the painted shapes with more gouache, letting some of the iridescent gold peek through.

The coral was behind glass, and I sketched it with a Kaweco Extra Fine nib fountain pen, filled with Noodler's Midnight Blue. I didn't think it would take to this surface, but it surprised me and did just fine! I used a waterbrush a little to spread some of the color for shadow areas.

Next up were some of the brilliantly-colored fish from the coral reefs. They were truly in perpetual motion, but I did the best I could. The blue fish in the top right box was such a bright color that I don't think he could be duplicated in paint, but I tried!

Monday

Kaaterskill High Peak from Across the Beaver Pond


This is my second-to-last sketch in my sketchbook for the Sketchbook Project 2012. It's a view from across the beaver pond behind my house, with Kaaterskill High Peak in the background, and the fall foliage reflecting in the water. There is a high bank there, shaped like a peninsula, with a beautiful grove of pine trees. Walking on the several inches of pine needles that have been accumulating for who knows how many hundreds of years, and smelling the pine smell, is really a magical experience.  This was painted on location with gouache. It is 7x10" across the two page spread in the sketchbook. I didn't date stamp or write on this entry yet, but I'll do so before sending in the book. All sketchbooks for this project will go on a world tour, and then be housed permanently in the Brooklyn Art Library in New York City.

Wednesday

Have I Found My Ultimate Sketching Setup?


I've been test driving this new setup for a couple of days now, and it has solved many of my "too many things to hold" problems! Finally I can use my great Escoda travel brushes again, instead of just a waterbrush! It was impossible to hold the sketchbook, palette, water cup, sponge, and brush, all at the same time, but those difficult days are over. This very lightweight setup holds the book open for me as well as enabling me to hold everything on my lap or supported with one hand, leaving the other hand free for my brush.

Here's what you need to make this hold-everything, light-weight sketch board:


  • 9x16" piece of Coroplast (available at http://beacongraphics.com. Go to Sign Making Supplies --> Blanks and Banners --> Coroplast)
  • 5x8" to 6x9" stitch-bound sketchbook
  • A few strips of Velcro
  • Watercolor pan set
  • Plastic oil painter's palette cup or double cups
  • A few extra-large metal binder clips
  • small piece of sponge


Instructions:

  1. Cut a piece of Coroplast to 9x16", so that it will fit into your backpack. (If you've got one of those extra-tall backpacks, you can go to 9x18".)
  2. Open the sketchbook to the next available page, and clip the open book to the left side of the Coroplast. (If you're left-handed, clip the book to the right side.)
  3. Position the open watercolor pan set on the upper right, allowing it to extend past the Coroplast if necessary. (Upper left if you're left-handed.)
  4. Using Industrial Strength Velcro cut to size, fasten the palette to that spot on the Coroplast. I fastened mine both on the lid and on the bottom of the palette.
  5. Clip an oil painter's plastic palette cup onto the free bottom corner of the Coroplast. If you like separating clean and dirty water, you can use the double cups.
  6. If you have room left over, clip on a piece of sponge to wipe your brush.


That's it! The photo below shows the setup with a 5 1/2 x 8 1/2" Stillman & Birn sketchbook, which allows for a little more room to hold the other things than the 6x9" books.

Of course, this idea can be adapted and the size reconfigured for whatever your preferred sketchbook may be. It is also equally effective for gouache as it is for watercolor.

Friday

View from the Catskill Mountain House Site


Before 1965, the Catskill Mountain House sat upon this rock ledge overlooking 60 miles of the Hudson River and the valley floor below, all the way to the Berkshire Mountains of Massachusetts. Visitors to the Mountain House would journey up the Hudson River by steamboat in the 1800s, and disembark in Catskill for the ride up to the mountains by horse-drawn carriage, and later by train. As modern transportation enabled vacationers to go further from the cities, the Catskill Mountain House fell into disrepair, and was taken down and burned by New York State in 1965, after they acquired the property. It remains one of the most dramatic views in the Hudson Valley, and I felt my sketchbook for The Sketchbook Project 2012 tour wouldn't be complete without it! It's brutally hot up on that ledge in the summer, but we had a relatively cool day and took advantage of the opportunity to paint there.

Wednesday

The Hudson River from Cold Spring

This is one of my favorite spots in the world to paint. It's in Cold Spring-on-Hudson, New York. There is a point on the river facing north where you can see Storm King Mountain (left), Little Stony Point (center) and Breakneck Ridge (Right), and paint under the shade of the trees. It was a brutally hot day when I was here painting with some friends, but a cool breeze off the river kept us comfortable. This is one of those famous Hudson River vistas that I really wanted to get into my sketchbook for The Sketchbook Project 2012, so that when the book goes on tour, others can enjoy the view as much as I do.

Sunday

Blazing Fields and Glowing Sunset from Olana


I spent a couple of days painting at Olana, mostly from this old carriage road called "Ridge Road". In Frederic Church's time, it was one of the main roads on the property, and he did many paintings from this location. Some sections are very overgrown, and we no longer have all of the magnificent Hudson River vistas from Church's days, but some areas have been cleared to let us see how it used to be. This is one of those cleared areas overlooking the Hudson, with the Catskill skyline and glorious colors in the sunset. Frederic Church did a famous painting very close to this spot, but that view is now closed off by foliage.

Wednesday

Constitution Marsh, West Point, and the Hudson River from Boscobel


7x10", Gouache
Sketch for The Sketchbook Project 2012, Brooklyn Art Library and World Tour

No sketchbook of the Hudson Valley would be complete without including the amazing overview from Boscobel Restoration in Garrison, New York. The vista showcases the Hudson River as it winds through the mountains of the Hudson Highlands, with Constitution Marsh in the foreground, and the massive buildings of West Point Military Academy along the opposite shore. A nice tugboat and barge even came by just as I was finishing up, so I was able to include some river traffic in the sketch.

Like last time, I got so involved in composing the scene and painting that I forgot to orient the sketchbook before I started. I ended up with another upside down sketch! I think my viewers will be dizzy by the time they arrive at the back cover of my sketchbook!

Saturday

Late Day Light at North South Lake


I can't believe I made such a dumb mistake, but I painted this upside down into my sketchbook for The Sketchbook Project 2012. So when my sketchbook goes off on its world tour, you'll all be able to arrive at this page of an upside down painting! I thought it best to at least post it right side up, so I'll save you the trouble of turning your computers over to view it the way it is in the book!

This was painted in gouache at the NYS DEC Campground at North South Lake, in Haines Falls, NY. The land shapes are broad and simple, which contrast with the complexity of the water movement, reflections, changing values, and pond scum in the water. Overall it's a very challenging scene that I have revisited many times.

Monday

The Hudson River from the Vanderbilt Mansion


This sketch was painted on location behind the Vanderbilt Mansion in Hyde Park, New York. It is watercolor and gouache, done in the sketchbook provided for The Sketchbook Project 2012, so it will be part of my book that will go on tour and reside in the Brooklyn Art Library.

The Vanderbilt Mansion sits high above the shoreline, overlooking the Hudson River, and is a favorite painting location for many artists in the Hudson Valley. After doing this sketch, I went down to the riverfront to do an oil painting. You can see that painting here

Tuesday

Review of the Nomadic Wise-Walker Messenger Bag


I have been dreaming of getting this Nomadic messenger bag for sketching materials ever since I saw it on the internet. The messenger bag I'd been using for sketching supplies was a bit larger than what I needed, and had a couple of serious drawbacks that the Nomadic bag addressed. My husband got it for me as a Mother's Day gift, and it is just perfect for my needs! I unpacked my old bag last night and loaded up the new one.


Here's the front of the bag. I selected the blue color, and it's a nice dark, neutral navy. It has a zippered pocket right on the front where you can keep identification, money, or anything you might need to get to quickly without having to open up the whole bag. As you can see, it easily stands upright, which is an important factor for me, since I keep lots of fountain pens inside it.


One thing this bag has that my other lacked is this wide, long shoulder pad. Since the strap adjusts from both sides, I finally have a bag that allows me to shorten the strap enough while keeping the shoulder pad centered. This is an excellent feature that more bags and straps should employ.


On each side, there is a mesh compartment for a water bottle. This particular bottle is oversized at 20 oz, yet still fits in there. A regular 16 oz. bottle would fit better. Not having to carry the water inside the bag is a great feature. It makes it much easier to take a sip while walking without having to open up the bag, or to pour extra water into a palette cup for painting. My old bag didn't have these water holders on the sides.

The bag is divided into two main sides. I set up one for sketching materials, and one for painting. Usually I do one and then the other, so it helps to have my materials organized this way. Here's a peek at the sketching side:


As you can see, there's room straight across the bag for loads of pens, pencils, waterbrushes and markers. A pocket in the front of that compartment can hold my sketchbook. There is another large pocket behind the pens that runs the length of the bag. I keep some tissues, erasers, a ruler, viewfinder, and other sketching supplies in there.


One really neat feature is these mesh pockets because they are translucent. I label all my pens so I can tell what ink is in which pen. I used to have to remove them from the pockets of my old messenger bag to read the labels and find the pen I needed, but now I can store them with the labels facing outward, and I can see what every color is! This is a huge advantage for me and a timesaver.

Turning the bag around and lifting the big flap, you can see into the main compartment of the bag:


If you carry a 9x12" spiral sketchbook, this is where you'll probably be keeping it, and it will fit easily. In front of that large, open area there is a zippered compartment where I keep my watercolor sets:


There are also pockets in front for brushes, waterbrushes, pens, and other supplies. You wouldn't believe how much this side of the bag can hold, even though the bag is not that large. I emptied out this  side to show you (below).


  • Viewfinder
  • Sunglasses
  • Reading glasses
  • Extra clips
  • Palette cup
  • Lots of waterbrushes and travel brushes
  • Correction fluid
  • Two watercolor sets
  • Hand wipes
  • Small sketchbook
  • Insect repellent
  • Sponges
  • Date stamp
  • Masking tape
  • 7x10 watercolor block
  • Drawing board
  • Tissues
  • Paper towels
  • Viewfinder
  • Small water bottle
  • Garbage bag
There's actually plenty of room left for my camera, binoculars, and sun visor. I don't necessarily carry this much when I go out sketching, but it's nice to know that it will all fit when I go off on a trip; then I can leave whatever I won't be needing in the car, or wherever I'm staying if I'm traveling. There are a few more compartments in this bag that I haven't detailed in this post because I'm not even using them yet! I'm sure that as I get out there and start painting and sketching with it, I'll reorganize it a bit and shift some of these items into those other pockets.

If you think you'd like a Nomadic Wise-Walker too, you can find them at Jetpens in black, blue or gray. You can see lots more photos of the bag there as well.

Thursday

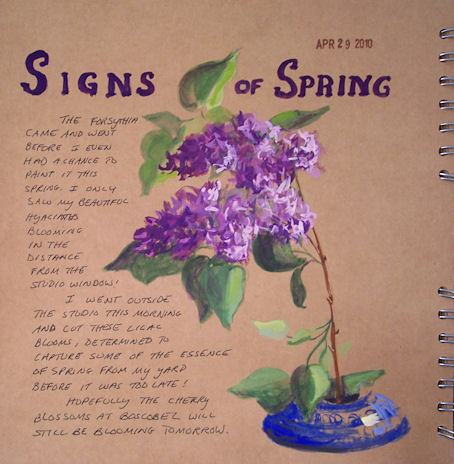
Signs of Spring


100429-Signs-of-Spring-450
Gouache in my 10×10″ kraft paper art journal
Text: The forsythia came and went before I even had a chance to paint it this spring. I only saw my beautiful hyacinths blooming in the distance from the studio window! I went outside the studio this morning and cut these lilac blooms, determined to capture some of the essence of spring from my yard before it was too late! Hopefully the cherry blossoms at Boscobel will still be blooming tomorrow.

Monday

More Bannerman Island Sketches


091021-Bannerman3-425
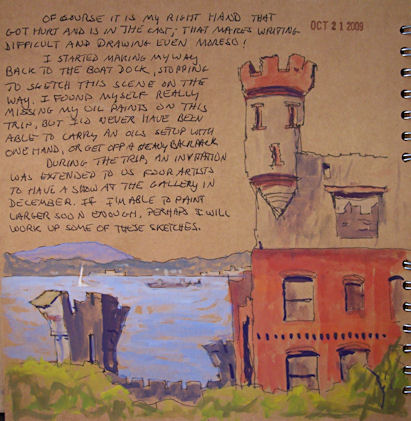
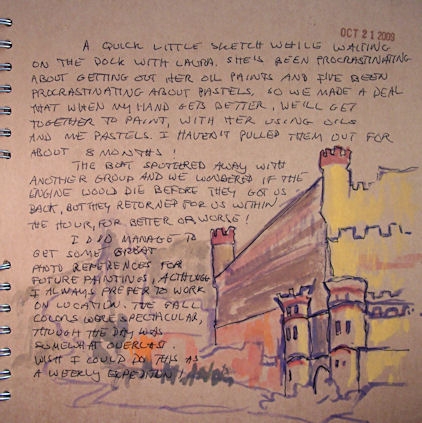
These sketches were done on October 21, along with the one I posted that day, although they are displayed out of order. The sketch posted on the 21st is #1. The post above is #3. Below is #2, and the last is #4–my last one of the day and a real quickie.
091021-Bannerman2-425
I didn’t get a chance to finish up the writing and take the pictures until today. Normally I also type out what I’ve handwritten, but with my hand/arm in a cast, it is a long and painful process to do either (not to mention drawing and painting!) Once I’m out of the cast, I’ll edit this post to include all the text.
091021-Bannerman4-425

Wednesday

Sketching on Bannerman Island


100_1473
10×10″, gouache in my kraft paper sketchbook
I had the good fortune to spend today out in the middle of the Hudson River on Bannerman Island, sketching the castle ruins. Because of my recent hand surgery, I couldn’t carry much gear. I just brought my sketchbook and some gouache. This was my first sketch of the day. The tide was very low, and the boat captain told us it was still going out. So, I walked out on a spit of land that jutted out into the river, and provided a great view looking back at the castle. Apparently the captain was wrong; the tide was coming in, not going out! It wasn’t long before my friend Laura called out to me, “Oh my gosh, Jamie, you’d better move right away!” I’d been so focused on my sketch that I didn’t notice my pathway of land had nearly vanished! I quickly threw my gear into my bag and walked back to land. I had to wade part of the way. When I’d reached shore, the spur of land was entirely underwater. I didn’t get to finish my sketch, but it’s a good thing I left the spot before it was done!

Monday

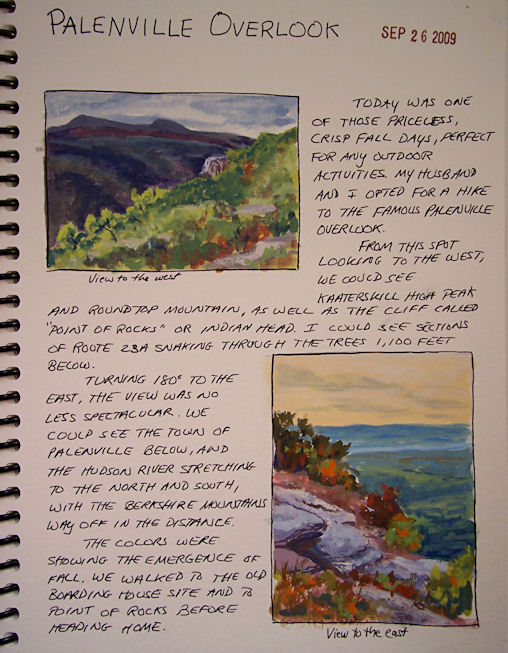
Palenville Overlook --- Gouache Sketches from the Catskill Mountains


090926-Palenville-Overlook-500v
Gouache sketches, 11×8.5″
Handwritten text:
Palenville Overlook, Sept. 26, 2009
Today was one of those priceless, crisp fall days, perfect for any outdoor activities. My husband and I opted for a hike to the famous Palenville Overlook.
From this spot looking to the west, we could see Kaaterskill High Peak and Roundtop Mountain, as well as the cliff called “Point of Rocks” or Indian Head. I could see sections of Route 23a snaking through the trees 1,100 feet below.
Turning 180 degrees to the east, the view was no less spectacular. We could see the town of Palenville below, and the Hudson River stretching to the north and south, with the Berkshire Mountains way off in the distance.
The colors were showing the emergence of fall. We walked to the old boarding house site and to Point of Rocks before heading home.