Showing posts with label Trees. Show all posts

Tuesday

Holidays in Ink Week 2


How are you all doing at the start of Week 2 of the Holidays in Ink Challenge? Please let me know in the comments! I began Day 1 on November 24 with the page spread of herons and flamingos above. The first page or two in a new sketchbook is always a bit intimidating for me, so I selected a more familiar subject from the prompt list to begin. I've been wanting to study the leg anatomy of the longer-legged birds, heads of herons, and upside-down beaks of flamingos, so I did some anatomy studies on the page as well. My process prompt was Line Quality. I aimed for longer, more expressive lines, and to avoid chicken-scratchy, short, choppy strokes. (Materials list for all of the sketches in this post is at the end.)

Monday

Holidays in Ink Challenge Week 1


Yesterday, I panicked! In spite of my posts and preparation so far, it suddenly dawned on me that Holidays in Ink was starting in two days, and I felt totally unprepared. I had no idea what I was going to sketch when the time came, and I didn't want to get sidetracked thinking about that when it was time to sketch. Are you feeling like that too?

So, yesterday I sat down and made a plan for the first few days, using the prompt lists in the Holidays in Ink post. I can always adjust it, but at least I have a plan. Once I did that, I felt 1000% better. 


You can play along with my plan, create your own from the prompt lists on this post, or do something entirely different. Feel free to post your plan in the Comments. Here's what I plan to do:

Megasketch Monday -- Drawing Trees

Gouache on black paper
Painted from life in Trish's back yard

For landscape painters, being able to capture the character of a tree, or the silhouette of a distant tree line, is an important aspect of making a successful painting. Project Megasketch gifted me with ample time to study many different ways of drawing and painting these beautiful and graceful living structures. Toward the end of the project, I combined what I'd practiced with some experimental approaches. I hope this post inspires you to push forward with a favorite subject of your own to develop skills and style. It doesn't have to be trees!

Ink and wash, from one of my own photos

Some I sketched from my own reference photos, like the unique tree (above) that resides at the Bronx Zoo. I tried to keep in mind what I'd learned about tree contours in the time I'd spent with the online

Saturday

Project Megasketch -- A Perfect Solution for Your Winter Blues


If you're an artist who doesn't like winter, maybe this post is for you! I used to hate winter. If you live in a cold climate and you're a plein air painter, you probably know what I'm talking about.  One solution for the Winter Blues is to give yourself a special winter art project to break free from your own mold.

Last winter, I embarked upon a drawing/painting/sketching challenge to see objects in a different way, and learn to capture them faster. My hope was that when I ventured out again in the spring to paint, the drawing/blocking in stage would be quicker and more accurate. I wanted to tackle subjects that I found difficult, or required a lot of maintenance and practice, such as perspective, drawing straight lines and round elipses, and being able to sketch a portrait likeness in just a few minutes. I wanted to improve on capturing the elegance and directions of tree branches, the graceful movements of animals, the bustling activity of people walking, and copy some works of the masters to explore their methods. I experimented with mixed media, and broke out all those fun art supplies that I rarely have time to use, or that have been sitting on the shelf untested.


I dubbed this venture Project Megasketch, and began it last November. I finished in April. Maybe it can help you get through the Winter Blues this year, while venturing into new art territory. For those who want to give it a try yourselves, or just follow my project along for ideas, stay tuned. Yours may have different subject matter and goals, but you can create a project that will benefit your art with the development of skills and exploration of techniques by following the process. I'll post regular prompts and examples from my project to help get you started and inspire you in the weeks and months to come. There aren't many rules to follow.

Project Megasketch Rules:


  1. Complete 600 pages, minimum size 9x12"-11x15", in any media. (Or set a different number of pages and size if that's too overwhelming. Make the challenge your own.)
  2. Fill each page. No cheating with half-empty pages!
  3. Work for sale or publication doesn't count. (More about this below.)
  4. Set dates to start and finish. It's okay to adjust that later if you have to. Life happens!
  5. Challenge yourself, but have some fun too.
  6. Trust the process.


Having read this far, if you're still interested, get a few sketchbooks the same size, or one enormous

Friday

Sketching from the Window


Today I did a monochrome tree sketch in acrylic, using the 14x22" spread provided by my Stillman & Birn 11x14" Alpha sketchbook. While I feel I could have worked on this much longer, I met my goals with it and also ran out of time. Sometimes I need to remind myself that I don't have to treat a sketch as if it's a finished painting! I have so many "sketches" in my books that I later wished I'd done on canvas or a piece of paper not bound into a book.


I use the Golden Heavy Body Neutral Gray acrylics when I do these. I keep them in a plastic container that has a waterproof seal. They last for years this way. I just add more paint as I run low. Having the values premixed means I don't need a palette, and I also don't need to spend time mixing.  I can just dip in and paint. The heavy bodied paints dry so fast that I can close the sketchbook pretty soon after I finish. The book is clipped to an 18x24" board, so it stays open easily. I rest the top on the window sill and the bottom on my lap as I paint. It's a very comfortable way to work if you have a really deep window ledge!

I don't do any pencil drawing when I work this way. I sketch in a few lines with light, diluted paint --- just enough to know where my basic forms will lie. Then I start blocking in the large shapes, initially working back to front, and then back and forth pushing layers and adding details as needed. I'll likely do some journaling on the left side of the page that I left blank. The S&B Alpha paper is so strong that there is no problem with painting acrylics on both sides of a page.

Tuesday

Monoprinting in a Sketchbook Part 2 --- Plein Air Monotypes

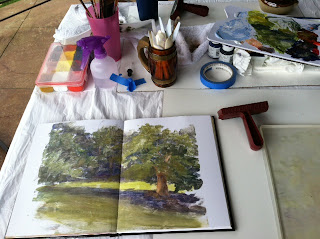
11x14" Monotype print across the two page spread
of an 8.5x11" Stillman & Birn Zeta hardbound sketchbook

After spending some time doing the prepared backgrounds in my sketchbook with the Gelli Printing Plate, which I showed in Part I, it was time to explore more painterly monotype prints. After a few rainy days, a gorgeous day finally arrived, and I was too exhausted to head out to paint on location somewhere. I wanted to stay home. I brought all my gear out to the patio for an afternoon of plein air monoprinting. I was excited about trying this across the two page spread of my sketchbook, like I'd done the backgrounds. As you can see, it worked out fabulously well and printed right up to the gutter on both sides. As I stated in Part I of this monoprinting series, it would be ever so much better if they would make the plate size 11x17, rather than 12x14!

I set out a folding table and covered our patio table, and prepared for an afternoon of relaxed image-making. 

One of the tricky things about monotype prints is that when you paint on the plate, you need to create your image in reverse. The image will flip when you press your print. (This is especially important if you are creating text!) This was all so new to me, and I had a hard enough time wrapping my head around the whole technique of getting the paint onto the plate in a way that would transfer well. I decided not to worry about the reverse images for now, and allowed my landscape to reverse itself when I pressed the prints.

For these monotypes where I painted with brushes on the plate, I used Golden Open Acrylics. I had tried it the day before with the traditional Fluid acrylics and found that even though the fluids worked well for me when doing the textured backgrounds, they didn't give me enough working time for painting with brushes. Monotype printing is a somewhat subtractive process, so you need to not only be able to put paint down, but also to lift it off to reveal the white of the paper when the print is made. You need to think like a watercolor painter in getting lights down and working transparently, and like an oil painter in layering and removing color. It certainly keeps you thinking!


Later in the day, I moved over to the other side of the patio so I could take advantage of the view off the other side. I didn't like this one as much as the other, but I learned a tremendous amount from both of them, and look forward to further exploration of the monotype process. Generally speaking, it would be hard to do this plein air when traveling to locations, but definitely not impossible if you use a smaller Gelli plate and work in a smaller size. (You can see the wheels in my brain turning, can't you?)

Are you intrigued? Well, then definitely give these Gelli Printing Plates a try! They're inexpensive and a lot of fun. They give interesting effects and force you to think outside of the box --- always a good thing! If you have Stillman & Birn sketchbooks, you can take full advantage of their ability to open flat so you can print across the spread. Creating a sketchbook of monoprints is an exciting endeavor!

Saturday

Outside My Window

This is another card I made for my mom a few weeks ago, but I never got around to adjusting and posting the photo. Sometimes when it's just too cold, as it was on this chilly morning in mid-March, I'd sketch something from my window. In this case, I selected a favorite tree and my awesome favorite TWSBI pen, filled with Noodler's La Reine Mauve ink. It's a great ink for sketching cards because it is totally waterproof. If the envelope happens to get wet on the way to its destination, the sketch will survive intact, and the writing inside the card too!

The card was made with Strathmore Aquarius II paper, and painted with diluted Golden Fluid Acrylics.

Tuesday

Little Juniper Bonsai

Click image for a larger, clearer view
Page was prepared with diluted acrylic paints--fluids and iridescent
Sketch Ink is Private Reserve Copper Burst in a Pilot Petit
Writing ink is Private Reserve Sepia and Noodler's Golden Brown
Sketchbook is a Stillman & Birn Epsilon, 5.5x8.5" hardbound

I was walking around the greenhouse at Adams Fairacre Farms in Wappinger, New York. As I rounded a corner, I noticed a little bonsai garden tucked away on one of the display tiers. I fell in love with this twisty little juniper bonsai. It made a perfect pen and ink subject. I definitely want to do more of these next time I go back there! I selected this teal page spread for it's greenish tones, and also because I felt this color ink would stand out so nicely against it. I just got a bottle of this Private Reserve Copper Burst, and it immediately became my favorite brown ink.

Wednesday

Four Sketches of the Hudson River

Click image for a larger view.

I have a large oil painting commission to do of a scene along the Hudson. The other day, I grabbed my sketchbook and watercolors and headed down to the location to do some preliminary sketches to discuss with the client, before proceeding on the large piece. It was freezing cold along the river early in the morning, but I know from experience that the light on the cliffs of the Palisades leaves early. By the time the sun is well overhead, they are all in shadow. I bundled up with my warmest coat, hat, scarf and mittens, and worked as fast as I could! Word from the client: "I love them all!" So, I'll be combining some elements for the final painting.

I taped off the rectangles to do the sketches while I was out on location. That kept my borders clean. I already knew what the dimensions of the large painting would be, so I stuck to those proportions. Once I got home, I drew in the borders around each sketch with a calligraphy pen, and used acrylic paints on the outside border, mixing colors to match the inside border's ink color. When finished, I painted a layer of Golden Interference Gold Fluid Acrylic, diluted with gloss medium, over the outer brown border. Although it doesn't show in the photo, there is a beautifully subtle gold sheen on the outside edge of the page.

Monday

Kaaterskill High Peak from Across the Beaver Pond


This is my second-to-last sketch in my sketchbook for the Sketchbook Project 2012. It's a view from across the beaver pond behind my house, with Kaaterskill High Peak in the background, and the fall foliage reflecting in the water. There is a high bank there, shaped like a peninsula, with a beautiful grove of pine trees. Walking on the several inches of pine needles that have been accumulating for who knows how many hundreds of years, and smelling the pine smell, is really a magical experience.  This was painted on location with gouache. It is 7x10" across the two page spread in the sketchbook. I didn't date stamp or write on this entry yet, but I'll do so before sending in the book. All sketchbooks for this project will go on a world tour, and then be housed permanently in the Brooklyn Art Library in New York City.

Saturday

Study of an Old Maple Tree Trunk


This was done out in my yard, using a 6B pencil in my Fabriano Venezia book. This old Maple has so much character from every angle. I did another drawing of it on Stonehenge, using a light and a dark on a colored ground. You can see that on this post on my Hudson Valley Painter website. Yesterday, I did yet another sketch of it from a different angle in watercolor. I'll be posting that one tomorrow on http://hudsonvalleypainter.com