Showing posts with label My Sketching Kit. Show all posts

Friday

Update on the Makeup Kit to Painting Set Conversion


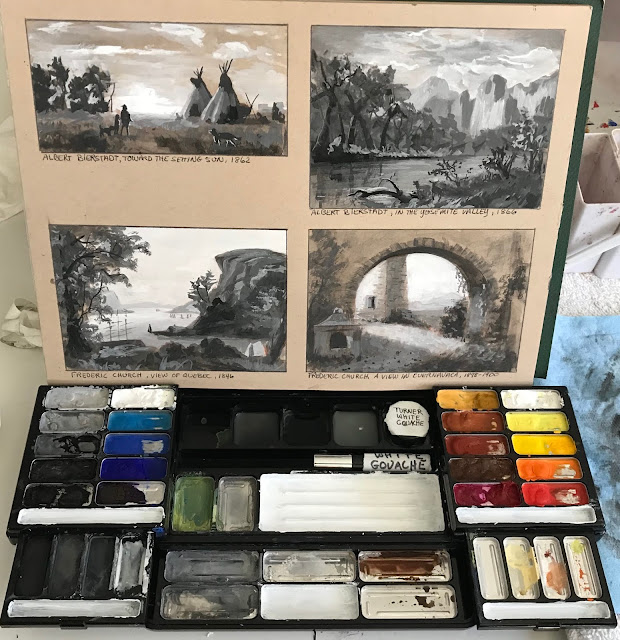
I've been enjoying my gouache paintbox that I converted from a makeup kit in my previous post, and have some updates for my readers. In this post, you'll find:

  • Solutions for issues that came up while using this box or a similar box. 
  • Link and photos of an available, relatively inexpensive makeup kit that will work well for those of you who have wanted to do something similar.
  • A couple of dollar store painting kit options to show you.

(If the full post with images does not appear below, click here.)

Wednesday

Makeup Kit to Painting Set Conversion


About five years ago, my daughter abandoned a makeup kit in the bathroom closet. It opened to reveal slide out trays with metal pans filled with eyeshadow, little screw cap pots for lip gloss, a mirror set into the lid, and even a small mascara tube. I have to confess that I coveted it from the first moment I laid eyes on it, hoping to someday convert it into a painting kit. The last time she came to visit, she gave it to me. Yes, I do wish I'd asked her sooner! 

(If the full post with images does not appear below, please click the post title above.)

Tuesday

Nomadic PE-07 Pencil Pouch Review --- Peek inside my sketch kit!


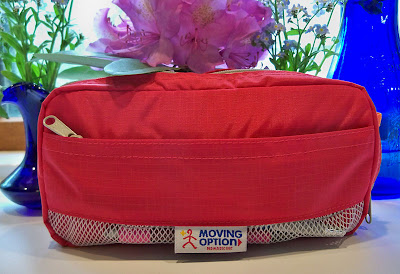
Finally, here is my review of the Nomadic PE-07 Pencil Pouch, otherwise known as my lightweight sketch kit! I'm going to give you a peek inside to share what's traveling with me everywhere these days. I bought a Nomadic Messenger Bag quite some time ago and I use it so much that I thought I couldn't go wrong with some more of their products. The pouch comes in lots of nice colors, and I love red. The small zippered compartment in the front is a very convenient place to keep items that I need to reach for first --- like a pen, pencil and eraser. I can do my initial sketch without having to even open up the bag. If I decide to paint or use brush pens, I then proceed to the larger, inside compartment.

Above is a photo of the pouch from the side, so you can see some of the nifty dividers, with supplies in there too. (The pouch looks orange in this photo, but only the inside is orange.) I like having that thin, center section with the zipper. It gives me a safe place to store my Escoda travel brushes, where they can't fall out even if the bag tips while open. I took out the pen, mini watercolor set, and waterbrush to do the sketch above out on location. Removing the rest of the contents, you can see how much I'm able to fit into this clever little bag in the image below:


Inside the pouch is stashed a mini set of gouache as well as the watercolor set, a vial that I filled with Dr. Martin's Bleedproof White, my beloved Kaweco Lilliput fountain pen, a few water brushes, three Escoda travel brushes, one travel squirrel mop brush, a small travel sable with protective sleeve, a grey Pentel Aquash brush pen, a Kuretake refillable brush pen, architect pencil, little mouth/gum scrubber to scrub out paint, Mini Mister to spritz my palette or sketch, small container of water (little yellow bottle), palette cup, two metal office binder clips to hold down sketchbook pages, UniBall Vision rollerball pen, and small piece of eraser. Whew, that was a mouthful! Typing it all out, it's hard to believe that it all fit easily into the pouch. I have since added a piece of sponge in there as well, to wipe my brushes as I paint.

This pouch is so so well designed and constructed. It has just enough compartments and dividers for me to separate items into categories, without having so many that they take up needed space or make it hard to find what I'm looking for. It weighs nothing, is small enough to stash in my purse, and super-convenient to toss it into my backpack if I'm going hiking or traveling and need an ultra-light art kit. This and a sketchbook, and I'm good to go anywhere. I've already taken it on many hikes and outings. Like all art bags and sketch kits, it will continue to change and evolve, so I'll be sure to show it again in a year or so. It will be interesting to see how the contents have changed in that time.

So, is there anything negative about this bag? Well, initially I wished it was a bit larger. However, I'm now glad that it's not. One thing I've learned about myself over time is that no matter how big a sketching bag is, I know how to fill it to the brim, and I'm going to do that! Therefore, the secret for me to traveling light is to have a small bag that can only accommodate so much. In my dreams, I have a large, light bag. It contains everything I ever wanted, and there is plenty of room left over. But in reality, my bags are always packed to the brim with way more stuff than I could ever use in a single outing. Clearly the supplies in the photo above are more than ample for a sketch outing. One day last weekend, I forced myself to cut the contents in half, and I didn't find myself missing a thing when I went to sketch! So now I can honestly say that the pouch is perfect for its intended purpose. I love it. And it's mine. And I'm not giving it up. So if you want your own, you'll just have to hustle on over to JetPens and get one for yourself.


Wednesday

Willow Tree in the Front Yard and Lilliput Review

11x17" across a two page spread in an 8.5x11" Stillman & Birn Epsilon hardbound sketchbook
Ink and Watercolor

I've been admiring the character these willow trees on our property, and looking forward to an opportunity to get out and sketch them. Yesterday after dinner, I was finally able to give into that temptation and scoot outside for 20 minutes or so. I set my stool in front of this massive willow tree and took out my beloved Kaweco Lilliput fountain pen, which is filled with Platinum Carbon Black ink. I love this pen. When closed, it is teeny tiny and perfect for my small sketching kit. The cap screws onto the back, so it posts firmly, and becomes long enough to sketch comfortably. If you click that link above, you can see lots of different views of the pen with a penny for size reference. Below is a photo of it next to my new (ultra-cool and more about this soon) Uni Gel pencil, so you can get an idea of the size compared with a mechanical pencil. I think this photo actually makes it appear larger than it is though.


I'm a big fan of Kaweco fountain pens and have quite an assortment. They are smooth, wet writers and highly reliable. The plastic-barrel Kaweco Sport pens can be converted to eyedropper pens, but since the ink can corrode metal, the Lilliput model cannot be converted. It has other benefits though, like its compact size, and the way it slips into my small sketch bag like a long silver bullet. It never leaks. It always starts right up. It writes like a dream and can keep up with my quick sketching without skips. For a little pen to slip into a pocket or small pouch, it simply can't be beat.

You can see in the photo above that the Lilliput pen, when posted with the cap, is certainly an adequate size for writing and sketching. It is thinner than a regular fountain pen, though that doesn't bother me.

After drawing for awhile, I decided to entertain my inner color junkie, and pulled out my mini watercolor set. That and a waterbrush were all I needed to complete the large, two-page spread. These three items --- Lilliput, waterbrush, and mini pan set, could have fit into a pocket. The little watercolor set can be found at Wet Paint. I pop out the kids' paints and substitute with my artist grade tube colors. For this sketch, I used Winsor Newton French Ultramarine, Aureolin, Brown Madder, and Daniel Smith Quinacridone Gold.

Tomorrow I'll take you on a tour of the little red bag in the photo. It is host to the contents of my current "small sketch kit". I can toss that pouch into any bag or backpack and I'm ready to go on a sketch outing.

Friday

Watercolor and Gouache are cohabitating in my palette!

Lexington Gray ink in a Lamy Safari fountain pen
Watercolor and Gouache
Stillman & Birn Epsilon 8.5x11" hardbound sketchbook

I finally found a way to set up my palette to fit watercolor and gouache together. I test drove it the other day and it worked fabulously well. A number of people have been asking me about this palette and how I did the reconfiguration, so here goes.....

I bought this palette online from Wet Paint Art Supply  in Minnesota. Apparently they are only made by special order, so Wet Paint ordered a bunch. Their customers liked them so much that they sold out almost immediately and ordered a lot more! The palette only comes with 12 colors (in two rows of six), with room for a third row of your own half pans and colors, for a total of 18. So, how did I transform this into something that will hold 32 half pans and one whole pan?

There is a metal plate with holders for the pans. It weighs a ton. I took that out. I fiddled with half pans in the empty space to see how many I could fit, and what the best configuration would be. I discovered that four rows of seven colors each would fit with the pans placed vertically,  but that I could squeeze in a fifth row if I had the pans run horizontally. In that last row, because of the curves on the corners of the palette, only five would fit. But I could fit a whole pan vertically in place of one of the half pans --- there was enough space to accommodate that. I am always needing extra white gouache when I'm painting with gouache, so I decided I'd keep my white in that one.

I took out a roll of adhesive magnetic strip. It comes rolled up like a roll of tape. I bought mine a long time ago and I don't remember what brand it was, but it looks something like this. I bought it in a craft store. I cut five strips that fit across the width of the palette. Since they were curled from being in the roll, I heated them with a hair dryer, which softened them a bit, and pressed them under a few very heavy coffee table books overnight. The next day, they were flat. With the adhesive side up (bare magnetic side down), I placed them in the palette, approximating where they would go.

I'd already decided which colors would go where the night before. I filled the pans that weren't already loaded, and wrote the names of the colors on each pan with a black fine point Sharpie. Starting with the top row, I peeled the paper strip off the magnet, revealing the adhesive, and stuck each pan down onto the adhesive strip, working across the row. I put in three rows of watercolor pigments (21 colors), then the 12 pans of gouache.

One thing about working watercolor and gouache together is that the opacity of the gouache, plus the chalkiness of white paint, can get into your transparent watercolor and destroy all that beautiful luminosity. This is why I always kept them in separate palettes. Since this metal palette has two sides, it keeps them separated easily. I'm used to having just two mixing areas for watercolor --- one for warm colors and one for cool. So the two sides of the top mixing area provide the wells I need. However, for gouache I need more areas, since I have to be able to mix value as well as color. All those little wells in the lower area are perfect for my gouache!

I was also able to eliminate the opaque watercolors from my palette. Usually I have cadmium red, a couple of cadmium yellows, cadmium orange, chromium oxide green, and a couple of other opaque watercolors in my watercolor palette. Now I can just substitute gouache when I need those, and keep all my watercolors transparent. That gives me an even larger color range than I had before.

I made the chart above so that I could keep track of what colors were in which pans, until I get to know my own system better. I also knew that initially, I'd be making some changes; that's why I numbered the pans on my sketch, instead of writing in color names. When I change a color, I can just change the name on the numbered list of pigments. I've already swapped out a few and shifted some around.

I've been looking for a way to do this for several years, but never found quite the right thing. This works for me at last!
Mini Muted Palette

Stillman & Birn 5.5x8.5" Epsilon Hardbound sketchbook
Watercolor, Noodler's Lexington Gray ink in a Lamy Safari

I had an extra mini kids' watercolor palette lying around, so I decided to use it for a limited palette. I chose an assortment of seven muted colors (since there were 8 spaces for paints after popping out the ones that came in the set), plus the white gouache that I always carry along "just in case". But then I thought, "Gee, seven colors plus white is really not a 'limited' anything!" Although I titled it Limited Palette because it's a range of muted colors, that's a term that us usually indicative of not only muted colors, but also just a few of them!

I played with mixes and made some determinations regarding what I want to keep and what I'd like to swap out for something else. The colors listed are a starting point, and I expect this palette will be an evolving exploration. I've already ordered some new colors to replace a few of these. I've been looking forward to using a group of mostly warm colors like these on lightly toned paper --- ivory or peach or some other warm tint. I am really loving the olive greens I'm getting with the Quinacridone Gold and Paynes Grey.

Thursday

Review of Some Waterproof Black Inks

Those of us who use inks in our journals need to know which ones will be waterproof for use with watercolors, or dissolve with a brush for ink and wash techniques. This post will examine some of the black inks that I like to use with watercolors, which claim to be waterproof. That's actually a relative term, because much depends on the amount of ink applied, as well as the sizing of the paper it's applied to. I'll be discussing:


  • Noodler's Bulletproof Black in a Noodler's Flex pen
  • Platinum Carbon Black in a Platinum Preppy 03 (fine)
  • Noodler's Lexington Gray in a Lamy Safari F
  • Uniball Vision Black

These are all fountain pen inks, except for the Uniball Vision. That's a rollerball pen available in most office supply stores. I'm including it here because there are times when it's just not convenient to travel with fountain pens, and that's been my main waterproof pen in those instances.

Although Lexington Gray is not quite as dark as black, I often prefer it to black when working with watercolor. Black can be a bit overpowering at times, and the Lexington Gray takes the edge off. Because I use it so much, I wanted to include it in the tests.

Like with the browns, I tested the inks on three different papers, to take the sizing variations into account.

The samples above were done on an Ampad Quad Ruled book. You can click to enlarge the image. I dried all the samples with a hair dryer, then ran a clean waterbrush over them several times. They all sat tight. Good news! Then I went to sized paper.


The swatches above were done in a Stillman & Birn Epsilon book made specifically for ink, then dried with a hair dryer, and washed over on the right sides with a clean waterbrush. Pens write like a dream on this surface, and the sizing lets the ink sit up on top of the page in the most beautiful way! But that same sizing enabled the Noodler's Bulletproof Black to move around a lot more than the other black inks shown.


Above are the same four inks, this time in a Stillman & Birn Alpha book. Results are about the same as with their Epsilon book, which isn't surprising as it's probably a similar sizing process.

Each ink definitely has its own character, and how waterproof it proves to be is just one of the factors when selecting an ink.

Noodler's Bulletproof Black was the darkest of the fountain pen blacks in this test. It also runs extremely well in my pens, never clogging and rarely even needing any kind of "jump start" after sitting for long periods of time. It continues to be my favorite of the true black inks.

Platinum Carbon Black was the most waterproof of the two true black fountain pen inks. That is my choice for use with watercolor if I want a true black ink, and plan to use it on paper that would cause the Noodlers to run. But it does clog up some of my pens. I've found it works well in the Platinum Preppy I used on this test, needing just an occasional nudge to get it going again, but it didn't perform well in my Noodler's Flex pen over time. I had to switch that pen over to the Noodler's Bulletproof Black, and it works great with the other ink. So, if you use this ink, you'll have to be a bit particular about which pen it resides in.


Noodler's Lexington Gray is almost dark enough to pass for black, and often that's exactly what I want. At times when black would be overly contrasty, heavy, or draw too much attention to itself, the Lexington Gray is the perfect solution. It has great waterproofing characteristics and good flow in all of my pens. I love it to bits! In fact, if I had to choose only one fountain pen ink to own, I think this would be it. I get lots of use out of this ink for all purposes from check writing to journal writing to ink and watercolor.

The Uniball Vision Black rollerball pen was not only the darkest of them all, but the most waterproof as well. Before I started using fountain pens, this was all I used. I bought them by the case and they went everywhere with me. I still take them along on trips when I need to fly somewhere, and keep one in the bottom of my purse, where I don't have to worry about leakage. So, why not just use that? Well, you fountain pen aficionados will totally understand.....It's a tactile thing. I just love the flow of the ink out of a fountain pen nib, the variations in the line with the speed, and the varieties of italic nibs or flex nibs that make writing or drawing with fountain pens so very enjoyable.

So, which one to choose? I say get them all! I use all of them all the time, and I'd rather not give any of them up. Each one has pluses and minuses, and each fulfills a need in my sketching kit. My main sketching bag has about 15 pens in it with various inks. These four are always in there, and often in more than one pen!

Wednesday

What if you were stranded somewhere without a sketchbook?


Here's a sketchbook that can be made on the fly with a single sheet of paper, no matter where you are! (You may have to pause the video if I'm flipping the pages too fast.) Instructions for making it are in Alisa Golden's book, Making Handmade Books. It's a little tricky to get the hang of it, but I made a few with scrap paper, and now I'm sure I can do it on the fly with whatever is at hand! A much larger book can be made by simply increasing the size of the sheet of paper. (This one was made with a piece of copy paper.)

Friday

My new watercolor palette and layout


I got this beautiful, new Schminke watercolor palette! It folds up nice and small, and is pretty easy to travel with. I decided that I wanted a setup with more colors that was still easy to cart around. It's a little larger than the palette I was using before, and I had to make a new sketchboard to accommodate the extra width. It came as a three row palette, but my husband trimmed a bit off the metal plate base so I could slide it up and squeeze in an additional row of half pans.

I also changed my color layout. It looks a little haphazard, but there is a method to my madness! In the top two rows, I put the opaque colors on the left, the transparents in the middle, and the earth colors over to the right. It's really helped to avoid mistakes between colors that look similar in the pans, but have completely different properties. The bottom row contains seasonal colors that will rotate, or exotic hues that I only use occasionally, colors I'm test driving, or colors that are easily mistaken for something else. (Quinacridone Gold is in that row because when it was in the yellow row, it looked so similar to Winsor Newton Raw Umber in the pans that I kept diving into it at the worst possible moments!)

The painted color chart was done so that I'd be able to remember what was in the set in terms of both color and brand. Some colors are completely different in different brands. That seems to be especially true with Raw Sienna and Raw Umber! I realized that if I wanted my mixes to be consistent, I'd have to be consistent in brands too, or at least test drive mixes in advance when trying new brands, so I can avoid some surprises when out painting on location.

Tuesday

Reviews of La Reine Mauve ink and Journaling Templates


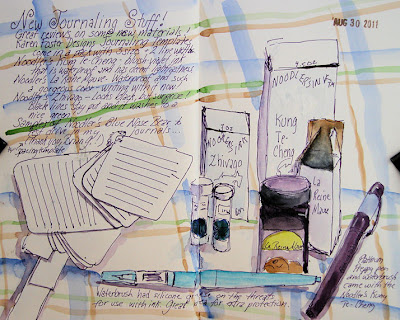
I got some great new art supplies to add to my journaling arsenal last week! I found this set of journaling templates by Karen Foster Designs that are going to enable me to finally write straight! They come held together by a key chain and offer a couple of different line width options. The widest is about 4", and I do wish there was a 5" and a 6" also, but I can just slide the template over to extend the lines.

In addition to Noodler's Kung Te-Cheng ink, which I reviewed yesterday, I also got their La Reine Mauve, Zhivago, and a couple of sample bottles of the new Blue Nose Bear. The brush pen and fountain pen shown above came with the Kung Te-Cheng ink --- a little bonus for having to purchase such a large bottle of it. I'm glad I love that one so much, because I don't think I'm ever going to run out of it!

The purple writing and drawing on this page was done with La Reine Mauve. How much do I love this ink? Let me count the ways! I purchased this to be a more vibrant purple version of the Kung Te-Cheng, and it does not disappoint! The ink has nice flow properties, and vibrant as it is, once down, it stays put. This is in the Noodler's line of bulletproof, eternal inks, so I don't have to worry about water spills or using watercolors over a drawing. And what a great color! La Reine Mauve only comes in a 1 oz bottle, so it's a bit on the pricey side, but worth every penny for its high performance and beauty.

More ink reviews coming soon! If you'd like these posts delivered to your email, you can just enter your email address in the box on the right sidebar.

Wednesday

Have I Found My Ultimate Sketching Setup?


I've been test driving this new setup for a couple of days now, and it has solved many of my "too many things to hold" problems! Finally I can use my great Escoda travel brushes again, instead of just a waterbrush! It was impossible to hold the sketchbook, palette, water cup, sponge, and brush, all at the same time, but those difficult days are over. This very lightweight setup holds the book open for me as well as enabling me to hold everything on my lap or supported with one hand, leaving the other hand free for my brush.

Here's what you need to make this hold-everything, light-weight sketch board:


  • 9x16" piece of Coroplast (available at http://beacongraphics.com. Go to Sign Making Supplies --> Blanks and Banners --> Coroplast)
  • 5x8" to 6x9" stitch-bound sketchbook
  • A few strips of Velcro
  • Watercolor pan set
  • Plastic oil painter's palette cup or double cups
  • A few extra-large metal binder clips
  • small piece of sponge


Instructions:

  1. Cut a piece of Coroplast to 9x16", so that it will fit into your backpack. (If you've got one of those extra-tall backpacks, you can go to 9x18".)
  2. Open the sketchbook to the next available page, and clip the open book to the left side of the Coroplast. (If you're left-handed, clip the book to the right side.)
  3. Position the open watercolor pan set on the upper right, allowing it to extend past the Coroplast if necessary. (Upper left if you're left-handed.)
  4. Using Industrial Strength Velcro cut to size, fasten the palette to that spot on the Coroplast. I fastened mine both on the lid and on the bottom of the palette.
  5. Clip an oil painter's plastic palette cup onto the free bottom corner of the Coroplast. If you like separating clean and dirty water, you can use the double cups.
  6. If you have room left over, clip on a piece of sponge to wipe your brush.


That's it! The photo below shows the setup with a 5 1/2 x 8 1/2" Stillman & Birn sketchbook, which allows for a little more room to hold the other things than the 6x9" books.

Of course, this idea can be adapted and the size reconfigured for whatever your preferred sketchbook may be. It is also equally effective for gouache as it is for watercolor.

Tuesday

Review of the Nomadic Wise-Walker Messenger Bag


I have been dreaming of getting this Nomadic messenger bag for sketching materials ever since I saw it on the internet. The messenger bag I'd been using for sketching supplies was a bit larger than what I needed, and had a couple of serious drawbacks that the Nomadic bag addressed. My husband got it for me as a Mother's Day gift, and it is just perfect for my needs! I unpacked my old bag last night and loaded up the new one.


Here's the front of the bag. I selected the blue color, and it's a nice dark, neutral navy. It has a zippered pocket right on the front where you can keep identification, money, or anything you might need to get to quickly without having to open up the whole bag. As you can see, it easily stands upright, which is an important factor for me, since I keep lots of fountain pens inside it.


One thing this bag has that my other lacked is this wide, long shoulder pad. Since the strap adjusts from both sides, I finally have a bag that allows me to shorten the strap enough while keeping the shoulder pad centered. This is an excellent feature that more bags and straps should employ.


On each side, there is a mesh compartment for a water bottle. This particular bottle is oversized at 20 oz, yet still fits in there. A regular 16 oz. bottle would fit better. Not having to carry the water inside the bag is a great feature. It makes it much easier to take a sip while walking without having to open up the bag, or to pour extra water into a palette cup for painting. My old bag didn't have these water holders on the sides.

The bag is divided into two main sides. I set up one for sketching materials, and one for painting. Usually I do one and then the other, so it helps to have my materials organized this way. Here's a peek at the sketching side:


As you can see, there's room straight across the bag for loads of pens, pencils, waterbrushes and markers. A pocket in the front of that compartment can hold my sketchbook. There is another large pocket behind the pens that runs the length of the bag. I keep some tissues, erasers, a ruler, viewfinder, and other sketching supplies in there.


One really neat feature is these mesh pockets because they are translucent. I label all my pens so I can tell what ink is in which pen. I used to have to remove them from the pockets of my old messenger bag to read the labels and find the pen I needed, but now I can store them with the labels facing outward, and I can see what every color is! This is a huge advantage for me and a timesaver.

Turning the bag around and lifting the big flap, you can see into the main compartment of the bag:


If you carry a 9x12" spiral sketchbook, this is where you'll probably be keeping it, and it will fit easily. In front of that large, open area there is a zippered compartment where I keep my watercolor sets:


There are also pockets in front for brushes, waterbrushes, pens, and other supplies. You wouldn't believe how much this side of the bag can hold, even though the bag is not that large. I emptied out this  side to show you (below).


  • Viewfinder
  • Sunglasses
  • Reading glasses
  • Extra clips
  • Palette cup
  • Lots of waterbrushes and travel brushes
  • Correction fluid
  • Two watercolor sets
  • Hand wipes
  • Small sketchbook
  • Insect repellent
  • Sponges
  • Date stamp
  • Masking tape
  • 7x10 watercolor block
  • Drawing board
  • Tissues
  • Paper towels
  • Viewfinder
  • Small water bottle
  • Garbage bag
There's actually plenty of room left for my camera, binoculars, and sun visor. I don't necessarily carry this much when I go out sketching, but it's nice to know that it will all fit when I go off on a trip; then I can leave whatever I won't be needing in the car, or wherever I'm staying if I'm traveling. There are a few more compartments in this bag that I haven't detailed in this post because I'm not even using them yet! I'm sure that as I get out there and start painting and sketching with it, I'll reorganize it a bit and shift some of these items into those other pockets.

If you think you'd like a Nomadic Wise-Walker too, you can find them at Jetpens in black, blue or gray. You can see lots more photos of the bag there as well.

Thursday

A Peek Inside My Sketching Bag

You can click on any images in this post to enlarge them.

Everybody always wants to know what's in my sketching bag, so I thought I'd take a post and open up the bag to show what materials go with me lately. This bag came with my Plein Air Pro easel. It's actually way too small for that. Although it just barely holds the easel, it cannot fit any of the supplies you need to go along with an easel --- like paint and water and mosquito repellent! Meanwhile, my sketching supplies were in need of a larger bag, so it was re-purposed to accommodate them, and the easel moved into a roomy backpack. This messenger-style bag fit the bill perfectly, with numerous pockets, a nice carry strap, and it's super lightweight.

 From the side, you can see that it has a zipper to expand/contract the entire back compartment. This is so convenient for when I want to lighten my load. I just remove a bunch of stuff and zip that up for a smaller bag, and I'm good to go anywhere.


With the front flap up, you can see all those great pockets for pens, pencils and brushes. The left hand pocket holds all my fountain pens. I've been experimenting with lots of different inks lately.
I spread out all the pens in this pocket to show you how I've been keeping track of what ink is in what pen while I'm test driving so many inks. My husband has a little label maker that's come in really handy, so I always know what I'm working with.
Most of these are Platinum Preppy fountain pens with a 05 nib. Some have been converted to eyedropper pens (as I explained on a previous post), others I'm refilling cartridges with, and I also use a couple with converters. They're very fast to write with and can easily keep up with my quick sketching. The three colored pens up front are Lamy Safari pens. I like that I can easily switch out nibs on these from extra fine to broad, and they write very smoothly.

 A separate pocket holds some mini misters for my watercolors, my beautiful Escoda sable travel brushes and a travel squirrel mop, a little brush thing for scrubbing from the pharmacy, and a correction pen. I see here that one of my Escoda brushes is missing. I probably put it in the wrong pocket and it will turn up somewhere....


The next couple of pockets hold my wonderful Kuretake brush pen, pencils, calligraphy pens, Uniballs, waterbrushes.....and OH! There's the missing Escoda travel brush, off cavorting with the calligraphy pens. :)

The middle section of the messenger bag is where I keep my sketchbooks and a foamcore board and clips. With a stitch-bound, hardcover sketchbook, I keep it open fully by placing the foamcore behind the open sketchbook, and clipping each side to the foamcore. There is no added weight to carry, and it's been a perfect solution to the deep gutter problem.

Now for that BIG back compartment....Let's take all that stuff out of there.

Inside you'll find:
  • sun visor
  • sun block
  • bug repellent
  • extra pair of sunglasses
  • inexpensive reading glasses
  • a couple of small watercolor sets
  • date stamp and ink pad that I always stamp my sketches with
  • pack of Pitt brush pens
  • masking tape
  • white-out
  • small bottle of water
  • pack of tissues (or cut up paper towel sheets clipped together, or both)
  • palette cup that clips onto the watercolor set
  • extra clips which are always needed for something
  • masking tape
  • white gouache
  • sponge
  • plastic ruler
  • small plastic container with kneaded eraser inside. 


This is what the little black watercolor set in the photo looks like when it's opened up. The middle row is supposed to hold a travel brush, but I put extra half pans in there so I can carry more colors. This is my favorite set for sketching. When I use a waterbrush, I don't need to clip on the little palette cup. I set a piece of sponge into a full pan to clean the waterbrush as I go. I can just wring it out when it gets soaked. If I need a larger one, I use one of the clips to attache the extra sponge to the kit.

To the items shown above, I might add:
  • A bottle of drinking water
  • Car/house keys
  • Cellphone
  • Wallet
  • Camera
  • Binoculars (depending on where I'm going to sketch)
  • Snack/Sandwich if I'll be out all day
  • Pack stool with shoulder strap

Materials lists of course change over time. Sometimes I empty a lot of it and go with gouache, or colored pencils, or even acrylics to work with in my sketchbooks. Part of the joy of working in sketchbooks is multi-media experimentation.

I hope you enjoyed this browse through my sketching bag.