Tuesday

New Product Review --- Introducing Stillman and Birn Zeta


If you're a fountain pen aficionado, sketch with ink and dip pens, love Pitt Brush pens, or the coverage you get with colored pencils on smooth paper, or mixed media on a plate-like surface of extra heavy-weight paper, you're going to adore this new Zeta paper from Stillman & Birn. Think of their fabulous Epsilon surface in a thicker, more opaque version, and you'll have a pretty good idea of what this paper is all about. When I first tried the Epsilon paper, I loved it so much that I wanted an even thicker version. Now it's here! Many thanks to Stillman & Birn for making my dream come true.

I was sent some 8.5x11" sheets of the Zeta by Stillman & Birn when it first came in from the mill in France. When I first saw and felt the Zeta paper, there seemed to be such a world of possibilities for media that would work well on it, that I didn't know where to begin. I wanted to do a sketch that would showcase the potential of this smooth, slick surface. I did a few sketches in watercolor and ink of flowers, pitchers, vases and fruit, and played with assorted inks and washes. Then I decided to sketch some of the materials I'd like to use on this paper, which became the inspiration for this particular sketch. I tossed some of my favorite pens, brushes, markers, crayons and pencils into a brightly colored little pot that I normally use for my painting water, and set out some paint tubes as foreground elements.I felt the colors in the setup were strong enough to carry a strongly colored ink. Noodler's Black Swan in Australian Roses is one of my favorites. It is not lightfast. It is not waterproof. But there is something magical about the color, so I keep a wonderful Sheaffer 100 loaded with this ink, and it is always with me. I like the way this ink weaves the color harmony of the sketch together. I started this sketch with a few pencil lines, then went right in with ink and did the drawing, working mostly front to back. I used a wet brush to create some wash effects with the ink in shadow areas, followed by the watercolor. The last step was putting in small ink details, like some of the writing on the paint tubes, which would have run if I'd done it earlier in the process. I accidentally did this sketch on the reverse side of my sheet of dark ink test swatches, which proved to be a testament to the high opacity of this paper; no ink lines showed through at all!

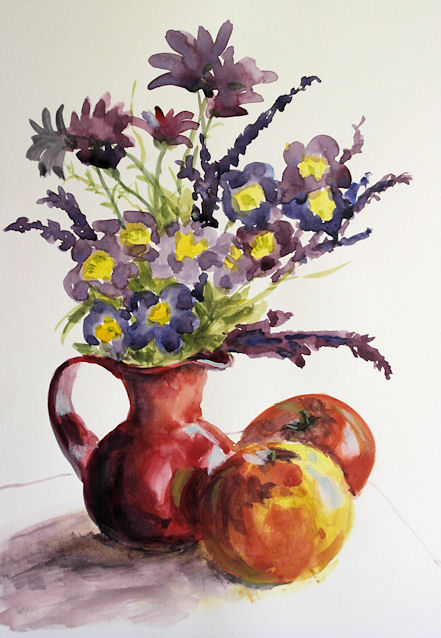
The way the internal and external sizing of the paper permits the paint pigment to lie on top of the page yields a wonderful brightness in the color. The pigment does not spread out and mix together like with traditional watercolor paper, so it does take some getting used to and adapting. I'm really looking forward to breaking out my gouache on this paper. I think it will be a great match. The sketch below was done with transparent watercolor and just a bit of white gouache toward the end for the lights. But actually, the sizing allows for pretty easy lifting of pigment, so I probably could have reclaimed those lights without adding white. This sketch is 8.5x11.


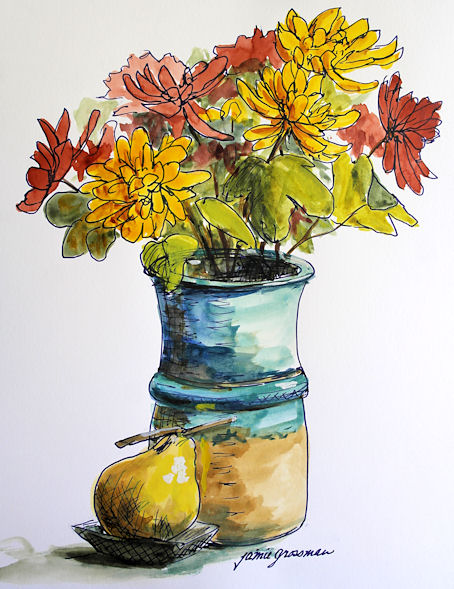
I also did a sketch with an ink that I know to generally be very waterproof. Since waterproof fountain pen inks are at least partially challenged by heavy sizing, I wanted to find out if Noodler's Kung Te-Cheng would run when I added watercolor. It's one of my favorite inks, and I wanted to be sure it would stay put on this paper, no matter what else I did to it. Well, as you can see, the ink did not run at all. The sketch below was done while visiting with my friend Gingie at RiverWinds Gallery in Beacon. They have so many beautiful displays there that it's a fun place to break out a sketchbook! This one is also 8.5x11"on the Zeta paper, using a Kaweco fountain pen with a broad nib and transparent watercolor.


There is so much more to explore with this paper. I can't wait to have it in sketchbook form. Finally there is an ink-friendly paper that does not show through to the other side at all, so there will be no ghosting of images when working front and back on the pages. If you enjoy working on smooth paper, this is definitely one to check out. I know I'll be going through a lot of it. If you would like to also read another artist's review of this paper, check out this post by Jeanne Powers-Forsyth.

Wednesday

Design Sketches for Palisade Memories

Click image for a larger, clearer view
Watercolor and acrylic on paper
(9x12" Stillman & Birn Beta Wirebound sketchbook)

This sheet of sketches was done to work out the major issues for an 8x16" painting of the Hudson River and Palisades. When I'm out painting on location, I don't usually have the time to plan to this degree. In my studio, however, time is on my side. I'm not having to drive long distances to locations and then try to make time stand still while the sun races across the sky and shadows change. Going through these planning stages yields a better painting in terms of composition, color, and overall design.

I began with the four tiny thumbnail sketches at the bottom of the page. Each is 1x2". I did them with black ink and a fountain pen, trying different places for the horizon, and scoping out where I wanted the boats to go. I sketched in a barge and tug for these thumbnails, but in doing so, I decided they detracted too much from the Palisades, which I wanted to keep as the main point of interest. When I went to do the larger study, I put in a small fleet of sailboats instead. They provide interest and break up the horizon line without stealing the show. Once I finished deciding what would go where, I pulled out some watercolors and played with color on the thumbnails. Then I did the larger study in acrylic, which would also be my medium for the finished painting.

Although I'd gone through all these stages, I still wasn't completely satisfied. I decided that when it came time to do the final painting, I'd shorten the foreground space so that the water and cliffs wouldn't mirror each other as much. I also wanted to scale back the tree on the left, so that it would break the horizon line, but not extend beyond the upper edge of the cliffs. You can click here to see the finished painting I did, based on this series of sketches.

Friday

Kaaterskill Falls from the Top

8.5x11" across a two page spread of a 5.5x8.5"
Stillman & Birn Beta Hardbound Sketchbook
Ink and Watercolor

On the way back from the Inspiration Point hike that I posted about yesterday, we detoured to the top of Kaaterskill Falls, where you can sit alongside Lake Creek just where it plunges over the 270 foot waterfall. There are dramatic distant vistas of the mountains from up there, plus beautiful rock outcroppings and intimate cascades. It was one of the favorite spots of the Hudson River School artists, and it's one of my favorites as well! They have done quite a bit of trail work there recently and the footing is vastly improved from the top of the mountain down to the top of the falls.

Thursday

Hike to Inspiration Point

8.5x11" across a two page spread in a 5.5x8.5"
Stillman & Birn Beta hardbound sketchbook
Ink and Watercolor

I went to Inspiration Point several times this past summer and fall. For some reason, it has beckoned me this year! The twisted birch tree on the left seems to end up being my sketching subject on the trips more often than not. I love the contrast in the trunk, and the way the backlit leaves light up against the mass of Kaaterskill High Peak behind them. The ink and watercolor were done on location. Once home, I added the border and lettering with a Pitt Big Brush Pen

Friday

Four Design Studies

Design Studies 3-6
Acrylics in a 9x12" Stillman & Birn Beta Wirebound Sketchbook

I'm going back to basics for awhile to revamp some things about my painting process. I've noticed some bad habits creeping into my paintings, and I'm really excited about correcting them and moving forward to make more of an artistic statement in my work. In order to accomplish these goals, I've dedicated this Stillman & Birn 9x12" wirebound sketchbook to the process, though I might do some of them on other supports too. This paper holds up really well to anything I throw at it, so here goes!

I'm planning to do at least one of these studies a day --- sometimes a full page, and sometimes just a portion of a page --- in addition to my regular paintings. Yesterday, I taped up a couple of pages into quarters so that I could do more of them faster. I'll do some of them in monochrome, but most in color. I may test drive different palettes too. The emphasis will be on design, and experimenting with how value, color, and composition work together in creating a painting that impacts the viewer.

These four studies were done with acrylics, using just Naphthol Crimson, Cadmium Yellow Light, Ultramarine Blue, Titanium White, and Carbon Black. I reverted to a red-yellow-blue simple palette in the interest of keeping my color clean and simplifying the process. (I usually do not use any Naphthol reds, but it's what I happened to have on hand, and whadaya know..... It worked!) I'm using acrylics because it dries quickly, doesn't lift, is opaque, and can be painted on paper. I'll probably do some of them in gouache and other water based mediums too, depending on what is convenient at the time.

In contrast to much of my work over the past few years, which builds on transparent layers, I am planning to work more directly with opaque paint on these. I'll work from life when I can, but I'll also work from photos. The two on the top of this page were done yesterday at the Eleanor Roosevelt National Historic Site in Hyde Park, New York. The bottom two were painted today from photos. The study on the bottom left was done from a photo taken during my recent Adirondack trip. The lower right is from a photo taken at my property in the Catskills.

I started out this series working the full 9x12 pages, but after the first two, I saw problems which would be more quickly resolved by working smaller and faster, and then bumping the size back up again once I've worked through the issues that I'm seeing. I'll do at least a few more quartered pages before I go larger again with these.

Monday

From a hike to Palenville Overlook

Stillman & Birn Beta hardbound sketchbook
Watercolor
Noodler's Luxury Blue Ink
Lamy Safari with EF nib


Sketched during our lunch break on a hike to Palenville Overlook with friends.

Sunday

Hunter Mountain Fire Tower

Stillman & Birn 5.5x8.5" hardbound Beta sketchbook
Watercolors
Lamy Safari with EF nib and Noodler's Luxury Blue
Pitt Big Brush Pen (for page border only)

Text:
We took the easier route to the fire tower by riding the chair lift up to the Colonel's Chair, and then hiking the two miles uphill to the tower from there. The views from the tower were spectacular, though beter for experiencing than for painting. We were grateful for having made the decision to bring sweatshirts along! They were certainly needed on the chair lift ride up in the morning, as well as up on the tower, where the wind was brisk and chilly.

Once back down on firm ground, we sat on some rocks by the ranger's cabin and had peanut butter sandwiches, and I pulled out my paints to sketch the scene. The top of the tower was blocked off. We couldn't figure out why they would do that, but perhaps they were trying to discourage people from spending the night up there or making a mess.

As usual, the trip down was a lot easier than it was going up!

Tuesday

Helderberg Escarpment at Thacher Park


Golden Airbrush Paints
(painted with a regular synthetic brush)
Stillman & Birn Beta Hardbound Sketchbook

This sketch was done from one of the overlooks from the Helderberg Escarpment at Thacher Park. It's truly an amazing place, with a path along the escarpment's edge that runs for about two miles. There are many cleared vistas along the way, complete with rock outcroppings, beautiful foreground foliage, and views that span several states. 

I love painting with these Golden Airbrush Paints. They are very versatile, but a bit cumbersome to travel with. I have some ideas brewing to make cleanup on location go a bit smoother and faster. 

Siuslaw Forest Preserve -- Golden Airbrush Acrylics and Silverpoint Ground

Golden Airbrush Acrylics
Golden Silverpoint Ground
Stillman & Birn 8.5x11" Beta 180lb Hardbound sketchbook

I've still got so many August sketches to post. My vacation is now over, and although I didn't get any oil paintings done in my wanderings with my husband, I did take a sketchbook and some sort of paints/pens everywhere with me. Now I need to start photographing the more recent ones, which have been patiently waiting for my new camera to arrive. I got a Samsung NX1000 while on my break time. That was a good time to get a new camera, since I had some down time to actually go out and take photos and get through a chunk of the manual. I'm hoping it will result in improved accuracy, better color, and crisper detail in reproducing my sketches and paintings.

Wednesday

Hiking the Old Stage Road


7.5x15" across a two page spread in a
custom Arches 140# Rough sketchbook

These sketches were painted during another one of the hikes I took with my husband this summer. We've always wanted to hike the old stage road up to the Catskill Mountain House site. It's a strenuous walk up the steep slope of the eastern escarpment of the mountains. We thought we'd be smart and leave one car at the bottom, drive up to the top where there's a parking lot, and walk the road downhill instead of uphill! We walked down leisurely, figuring we had all the time in the world before meeting friends later for dinner. As we arrived at the bottom, I realized that I'd left my car key locked in my husband's car at the top of the mountain! We had no choice but to turn around and walk all the way back up to his car. Needless to say, I don't think I'll ever make that mistake again when hiking point to point!

Monday

Windham High Peak --- Sketching and hiking


My husband and I hiked up Windham High Peak. It was a long way to cart art supplies, but I packed light, bringing just my Arches 140# Rough custom hardbound sketchbook and a watercolor pan set. I had pre-taped the page borders to speed the process along, and did the writing (shown below) after returning home.

Friday

Golden Airbrush Paints and Silverpoint Ground --- Who knew!

Golden Airbrush Acrylics on Silverpoint Ground
8.5x11 across a two page spread in a Stillman & Birn Beta (180 lb) hardbound sketchbook

A few weeks ago I went to the Golden Artist Colors factory for the day. In addition to other things, I was able to spend a few hours with tech staff to discuss some things I've been trying to achieve with acrylic paints, and possible alternative solutions to my mission. One of the things I was able to play with that day were the Golden Airbrush Paints and Silverpoint Ground. When one thinks of painting with brushes, Golden Airbrush Paints are not what come to mind! (Neither does painting on Silverpoint Ground, or using Silverpoint Ground to reclaim whites in a painting.)

Well, I was smitten with the possibilities of these paints! First of all, they are very highly pigmented, yet already in an ink-like consistency. This gives me an ideal solution to achieve watercolor-like pigmentation without the pigment disappearing on me. Furthermore, the Airbrush Paints have something that the Golden Fluids do not: retarder! Yep, the retarder is already added to the paint, so it stays workable longer on the paper, and can be lifted before it sets if you work quickly.

The down side to working with these has been finding an easy way to use them on location while out hiking. I've been experimenting with a few different ideas as I've carted them around. This sketch of Kaaterskill Falls was done on location in about 40 minutes. The pages were prepared in advance with Golden Silverpoint Ground. I applied two coats, drying with a hair dryer in between. The idea was that by sealing the surface, it would be easier for me to make use of the lifting capabilities of the Airbrush Paints. On location, I coated the entire sketch area with Transparent Red Oxide mixed with some Airbrush Medium. Then I used a piece of paper towel, sometimes dipped in water, to pull out my lights, as if I were doing an underpainting in oils. I continued to work transparently for awhile, adding darks and pulling out lights, then used more opaque paint toward the end. I used a little Silverpoint Ground for some highlights and light, opaque color mixtures. It has a very heavy Titanium Dioxide content and worked great! I'd put about 5ml into a small empty vial from an ink sample.

Transporting paints in a watery consistency has issues for sure. For one thing, I can't use the same palette that I can for oils or acrylics, nor any flat or disposable palette, for that matter. I ended up using two small, rectangular watercolor palettes that I taped together on one end so it could fold in half. I put velcro on the outside to affix it to my lap board with the sketchbook. That's worked out pretty well so far. I bring several of the small airbrush bottles of color with me, and pour them into the palette on location. Cleanup is a serious mess, and remains the biggest problem for me to resolve when out on location.

Here's a photo of the scene with my sketch. Unfortunately the sketch was in shadow and the scene in light, so it's a bit hard to see the sketch.


Wednesday

Experimenting with Grounds --- Watercolor on varnished paper

Watercolor on varnished paper
Stillman & Birn 5.5x8.5" Hardbound Sketchbook (180lb paper!)

I decided to use one of the brand new Stillman & Birn extra heavy weight Beta hardbound sketchbooks to experiment with various grounds and mediums. The size makes it easy to travel with, so I've prepared a bunch of pages in advance and I take the book out hiking with me. Since I have very little time to sketch on the hike outings, they serve double duty by allowing me to do my media experiments simultaneously.

For this page spread, I used two coats of Golden Polymer  UVLS Varnish  (Gloss), rubbing it in with a paper towel to make as smooth a surface as possible, and drying the paper between coats with a hair dryer. Then, off to Olana I went to do a rather monochromatic, tonal sketch of a sunset overlooking the Hudson River. I used four tubes of watercolor: Winsor Newton Burnt Sienna, Daniel Smith Quinacridone Burnt Scarlet, Daniel Smith Quinacridone Gold, and Holbein Permanent White (gouache). The idea was to use the watercolor the way I'd use oil paint, since the varnished surface would allow me to pull out my lights right down to the paper, and enable me to use the paints in both transparent and opaque ways. Landscape painter David Dunlop sketches this way a lot and does it very effectively!

It turned out to be more of a challenge than I thought it would be. The paint had to be used full strength because any water added caused it to bead up on the surface. It dried very quickly and was hard to lift without adding water, yet when the water was added, it all beaded up and came off immediately, right down to the white of the paper. I think this will have great potential for me as a sketching method --- it was fast to work with, and not having to carry solvents nor worry about the paint drying out on the brushes makes it ideal for travel. It also lets me use the same techniques I use in oils. However, I'm going to have to try to find some kind of medium that can thin the paints yet doesn't bead up. I'm open to suggestions! It also has to be able to dry quickly enough so that I can close the book and put it back into my backpack without worrying about sticking. I'm looking forward to experimenting more with this idea.

Tuesday

Summertime at the Beach

11x17" across a two page spread of a Stillman & Birn Beta Hardbound sketchbook
Golden Fluid Acrylics

I think this is one of the busiest summers I've ever had. In addition to lots of painting and taking a one week workshop, I've been having such a great time with my husband while he's been on vacation that it's been hard for me to keep up with photographing images and writing posts. I've been sketching like a madwoman, so I've got a lot of catching up to do!

This was sketched on location at North Lake Beach while out painting with my friend Nancy. Sometimes I just don't want the pressure of feeling like I need to turn out a "finished painting", so I relax and play in my sketchbook. This was one of those occasions when in spite of wanting to work larger, I knew I wouldn't have time to complete a large painting. I couldn't stand the thought of yet another large, unfinished painting hanging around in my studio, and I didn't want to work small. It was just what the doctor ordered for this summer day by the water. I'm liking this scene a lot and will probably go back and do a painting from here sometime soon.

I'm loving working in these Stillman & Birn Beta Hardbound sketchbooks. The 180 pound paper doesn't buckle at all, and it's possible to experiment with all sorts of grounds and surface preparation, as well as any medium. I have an 8.5x11", and also recently started a 5.5x8.5" version for when I'm out hiking and can't carry such a large book with me.

Thursday

House Portrait Sketch


About 6x8", across the spread of a Stillman & Birn Epsilon hardbound book
Caran d'Ache Supracolor Soft Ivory Black

This is a first compositional sketch for a house portrait commission. The client wants a painting that varies pretty significantly from the photos I was sent. In these situations, I like to be sure I'm on the same page with the client, so I do some preliminary sketches and color studies to find out if this is the direction the client wants for the piece. It always results in a very happy ending to work this way!

I really love working with these Supracolor Soft pencils for studies like this. I haven't pulled any of them out for quite some time, and I forgot how much fun they are! The S&B Epsilon surface is such a friendly support for pencil work. A wet brush with these pencils unifies the darks, and they wash beautifully. They don't erase well, but for preliminary work, I don't mind some stray lines here and there. For a more finished piece, I'd have made my initial marks in graphite, then switched over to the Supracolor when my lines were secure.

If you're concerned about lightfastness when using colored pencils/watercolor pencils (as I am), you can check out this PDF brochure, which contains lightfastness information for the individual pencils, and select ones from open stock with excellent ratings (***).

Monday

Sketching the Pinta in Acrylics

11x17" across a two page spread in a prototype Stillman & Birn Beta hardbound book
Golden Fluid Acrylics
Writing done with Pitt Big Brush Pen
Image can be clicked to enlarge it

It's so much fun to have these large pages that open flat to be able to spread out and sketch across a large expanse of paper. Since I have this extra heavyweight (180lb.) prototype book, I've been doing some sketches in acrylic too. Why be limited?!

The Nina and Pinta replica ships docked in Newburgh, and a number of us from Lower Hudson Valley Plein Air Painters went to sketch them. To our dismay, they were way out on a private marina dock, almost completely blocked from view by yachts in front of them. A restaurant next to the marina, Bill Joe's Ribworks, came to our rescue and allowed us to paint and sketch from their beautiful property, which had a perfect view of the Pinta. Bonus: We all treated ourselves to a fabulous lunch there! Be sure to check it out if you ever find yourself along the Hudson Riverfront in Newburgh.

When I closed the book, the paint in the gutter of the book was still a little damp, which is why it stuck together a bit as you can see in the center of the sketch. This book is really amazing for multi-media work and wet washes. It doesn't move at all!

Tuesday

Expansion of the Hudson River School Art Trail


8.5x11" across a two page spread of a Stillman & Birn Alpha Hardbound sketchbook
Platinum Black Carbon Ink and Watercolor
Image can be clicked to enlarge

On June 2, the official announcement was made about the expansion of the Hudson River School Art Trail to include many new sites. Kevin Avery, from the Metropolitan Museum of Art, gave a wonderful lecture at the Thomas Cole National Historic Site about these official Art Trail locations as well as other spots where the Hudson River School Artists did some of their most famous work and their plein air studies. (Of course I couldn't resist sketching during the lecture.) Click here to read more about the Hudson River School Art Trail. You can download maps and information on the website.

Monday

Lihit Lab Teffa Pen Case and Ohto Comfort Sharp Lead Holders Reviews


This classy-looking pouch is the Lihit Lab Teffa Pen Case. I've filled it with watercolor supplies to serve as a medium size watercolor sketch kit.

Most of you have probably seen my recent review of the Nomadic PE-07 Pencil Pouch, which I use as a very lightweight sketch/watercolor kit. That one lives in my pocketbook and I do love it. It's perfect for those unexpected sketch opportunities that come along while waiting for someone or something.

But I do miss my real brushes, as well as my slightly larger palette for those real brushes. I wanted an additional kit to take hiking and plein air painting, that can work with my custom Arches Rough sketchbook, as well as with the larger 8.5x11" Stillman & Birn books. Those books require the ability to lay down more paint with larger brushes, at least half-pan size paint reservoirs, and larger mixing areas. I ordered this Lihit Lab case to serve that purpose.


As you can see, the front of the case does a great job of holding my brushes, pencils and pens. I considered putting a small piece of Velcro in the center of the upper strip to hold the brushes in place better. The Velcro would give the brushes more security, but would take up space and reduce the number I could fit in there. I decided to try it the way it is first, and it worked just fine.

The brushes were a bit too long and needed help to fit in there. I measured how long they could be, cut them down with a hacksaw, and sharpened the ends with a pencil sharpener so they could be used to scratch out twigs, branches, etc. Then I dipped the sharpened ends in Golden GAC100 to seal the wood. I used old sables and synthetics, since I didn't want to butcher any fabulous brushes that also might get lost out in the field while hiking.


On the left in the above image, you can see my latest favorite pencil lead holders. I've always loved 2mm leads, but the ordeal with trying to keep them sharpened made them difficult to use when convenience is a factor. Well, have I got great news for you! These lead holders come with a sharpener in the end. Yep, problem solved! They are only $3.30 each (and come with a lead) at Jetpens.


I have 2mm leads in many grades of hard/soft, so I made up some labels on a label-maker, and put a different lead into each of the four that I got. Here's a closeup shot of the top of the pencils so you can see where the sharpener is:


Turning over the center divider, you can see how I organized the back of this kit:


My palette and a Mini Mister slide right into the pocket together at the back of the case, and there's room above them for double clip-on oil painting palette cups to hold my water. By keeping one water cup for warm colors and one for cool, I can get by with very little water. As hikers know, water is both precious and heavy to carry! Opposite those are small web pocktes that I use for holding a mini scrubber (from the pharmacy, for brushing gums/teeth), a little vial of Pro White (in place of white tubed gouache), a kneaded eraser, and a metal binder clip.


The palette has velcro on the back of it, and gets affixed to a 9x12 piece of Coroplast (a very lightweight, corrugated plastic), which I've prepared with the other side of the velcro. The palette cups clip onto the bottom of the board, like this:


The empty side of the board then slides into the sketchbook to help keep it secure. You could use rubber bands around the board and page for additional security if you wish or use a large metal binder clip. I can sit very comfortably with everything on my lap this way, and have both hands free.


This little, light setup enables me to paint 11x17 without even having to cart an easel around with me! I put a weightless closed cell foam gardening cushion in my backpack and I can sit almost anywhere in comfort.

So, how did this work out in practice? It worked great! I've taken it out three or four times now, and have come away with a few conclusions:

  1. The Lihit Pen Case is the perfect size for this kit. If it were any bigger, I'd be cramming it with more stuff that would be heavy and unnecessary for watercolor sketching. It fits the palette and exactly what I need to go with the palette. No more, no less.
  2. I desperately need a squirrel mop brush for this kit, since this setup enables me to go large enough to make use of it. I'll have to buy one or two inexpensive ones to cut down because I am NOT butchering my Rekabs!
  3. About half of the brushes I do have in here I won't need. I'm going to whittle down the assortment before I go out again.
  4. Keeping the kneaded eraser in a plastic case is a pain in the neck and wastes time. I'm going to remove it from the case and stick it in with the brushes.

Sunday

Just Doodling

Just Doodling, 8.5x11" (across the spread)
with a 2.4mm Pilot Parallel fountain pen
in a Stillman & Birn Alpha Hardbound book, 5.5x8.5"

Sometimes I really like to draw nothing at all. Drawing nothing is especially fun with a fountain pen, total exhaustion, and the TV on. Mindless mark-making is one of my favorite ways to relax at night when I'm too tired to do anything else! I'm wishing I'd used waterproof ink so that I could go back with red transparent watercolor and color in the boxes for the DOODLING letters. Too late now!

Saturday

Waiting and Sketching at White Plains Airport

8.5x11" across a two page spread in a Stillman & Birn Alpha 5.5x8.5" Hardbound book
Noodler's Black Swan in Australian Roses ink in a Sheaffer 100 fountain pen
Ink blended with a waterbrush, then transparent watercolor added

It's times like this when I'm especially grateful to be an artist. You could leave me alone with a sketchbook and some art supplies and a few apples, and I'd be fine for days! The rest of the passengers didn't share my enthusiasm for a bit of extra sketching time though.

White Plains Airport is actually a pretty fun place to sketch, with large model aircraft hanging overhead in the tall space. The last time I flew out of here, the flight was cancelled, so I considered myself lucky that the plane was just delayed this time around. The trip itself was so busy that I didn't get an opportunity to sketch again until I returned home.

Wednesday

More Watercolor and Gouache Palette Talk


Many people have been asking me about this watercolor palette over the past couple of days. I have explained in a previous post what I did, but perhaps that got overlooked because I didn't provide a photo of the actual conversion (above). When I bought this palette, it came with twelve half pans, secured in metal holders. I hated the paints. I took out those paints, replaced the colors with my favorite tube colors, and over the years have reconfigured it many different ways.  If you're interested in one of these, I've found the palette alone for a very reasonable price at Wet Paint Art --- click here.

I really like the size of this palette. It's small and portable, even when the flaps are opened up, and not too heavy for a metal palette. If you look at the image below, you'll see that you can not only fit half pans into two rows, but if you use the middle section (which is meant to hold brushes), you can fit a third row in there too.
For a long time, that's the way I configured this palette --- with three rows of paints, like the image below:


When looking for a way to incorporate my gouache pigments in the same palette as my watercolors, I needed more space. I removed the metal plate and clips that hold the half pans in the case. By doing that, plus turning all the half pans so they ran horizontally, I could fit in another entire row of half pans! Using just the outer metal case and removing the inside dividers also lightened the palette considerably. I secured the half pans in the case using the white tacky putty you can get at Staples or in craft stores to hold posters onto walls.

In the first photo at the top of this post, the bottom row of paint is gouache. You can read more about my pigment choices and this setup on this post. Remember that if you put watercolor and gouache into the same palette, you have to be sure to keep them separate when you mix your colors! Allowing the gouache paints to migrate into the watercolor pans will diminish the transparency of your watercolors. I use the bottom metal flap to mix my gouache, and that leaves the top two, larger mixing areas for my watercolors. Since I generally go from transparent to opaque (if I go opaque at all), I use the entire palette for watercolors, then just the bottom for gouache near the end of the process. I clean off the bottom mixing area before using it again for watercolor.

Tuesday

Hike to the Overlook Mountain House Ruins

Watercolor, 7.5x15" across a two page spread 
of a handmade hardbound Arches 140# Rough watercolor book
Image can be clicked for a larger, sharper view.

Last weekend, my husband and I climbed two and a half miles up Overlook Mountain to the ruins of the old Overlook Mountain House. All that effort really does pay off once you arrive at the dramatic structures. I sat on a stone stairway opposite the main building to do this quick watercolor and enjoyed every second of it! I hope to do some paintings and sketches from photos I took there, but I wanted to do at least one on location. The bugs were horrendous, and in spite of using DEET spray that was 98% pure, I got bitten to pieces in the process. Hiking down was a lot easier than going up there. I am so glad that I have some really lightweight painting/sketching gear now to take along on trips like this one.

Monday

May Ink Drop

11x17" across a two page spread in a Stillman & Birn Epsilon Hardbound sketchbook
De Atramentis Rose
De Atramentis Hyacinth
De Atramentis Elderberry
Diamine Meadow
and Pilot Iroshizuku Murasaki-Shikibu inks
Assorted dip pens

At the beginning of every month, five vials of ink samples arrive in my mailbox via the Goulet Pen Company Ink Drop. I don't always have time to test drive all of them right away, but this month I pulled them out and played with a bunch of dip pens to see what the colors looked like and how they washed with a wet brush. Every color was a winner, and I found myself surprised by how much I enjoyed working with the scented inks like the Rose and Hyacinth.

None of these inks are "archival" in terms of being able to hang a sketch on a wall where it would be exposed to sunlight. But they should fare fine inside a sketchbook as long as it's not dipped in water!

Sunday

Spring Flowers from My Garden

11x17" across a two page spread of a Stillman & Birn Epsilon Hardbound book
Watercolor and Pitt Big Brush Pens

Sometimes it's easier to tackle a single rectangle than to take on an entire two page spread, so I really enjoy setting up grids for various series of things I want to paint when I'm short on time. You can click the image above for a larger view of the sketch.

Here's my setup below, as I finished up the final section. I have a piece of Coroplast (corrugated plastic that is nearly weightless) to which I velcro my palette and clip on my palette cups. It extends under part of the book, which weights it down so it won't fall over. That leaves me hands free.

Tuesday

Nomadic PE-07 Pencil Pouch Review --- Peek inside my sketch kit!


Finally, here is my review of the Nomadic PE-07 Pencil Pouch, otherwise known as my lightweight sketch kit! I'm going to give you a peek inside to share what's traveling with me everywhere these days. I bought a Nomadic Messenger Bag quite some time ago and I use it so much that I thought I couldn't go wrong with some more of their products. The pouch comes in lots of nice colors, and I love red. The small zippered compartment in the front is a very convenient place to keep items that I need to reach for first --- like a pen, pencil and eraser. I can do my initial sketch without having to even open up the bag. If I decide to paint or use brush pens, I then proceed to the larger, inside compartment.

Above is a photo of the pouch from the side, so you can see some of the nifty dividers, with supplies in there too. (The pouch looks orange in this photo, but only the inside is orange.) I like having that thin, center section with the zipper. It gives me a safe place to store my Escoda travel brushes, where they can't fall out even if the bag tips while open. I took out the pen, mini watercolor set, and waterbrush to do the sketch above out on location. Removing the rest of the contents, you can see how much I'm able to fit into this clever little bag in the image below:


Inside the pouch is stashed a mini set of gouache as well as the watercolor set, a vial that I filled with Dr. Martin's Bleedproof White, my beloved Kaweco Lilliput fountain pen, a few water brushes, three Escoda travel brushes, one travel squirrel mop brush, a small travel sable with protective sleeve, a grey Pentel Aquash brush pen, a Kuretake refillable brush pen, architect pencil, little mouth/gum scrubber to scrub out paint, Mini Mister to spritz my palette or sketch, small container of water (little yellow bottle), palette cup, two metal office binder clips to hold down sketchbook pages, UniBall Vision rollerball pen, and small piece of eraser. Whew, that was a mouthful! Typing it all out, it's hard to believe that it all fit easily into the pouch. I have since added a piece of sponge in there as well, to wipe my brushes as I paint.

This pouch is so so well designed and constructed. It has just enough compartments and dividers for me to separate items into categories, without having so many that they take up needed space or make it hard to find what I'm looking for. It weighs nothing, is small enough to stash in my purse, and super-convenient to toss it into my backpack if I'm going hiking or traveling and need an ultra-light art kit. This and a sketchbook, and I'm good to go anywhere. I've already taken it on many hikes and outings. Like all art bags and sketch kits, it will continue to change and evolve, so I'll be sure to show it again in a year or so. It will be interesting to see how the contents have changed in that time.

So, is there anything negative about this bag? Well, initially I wished it was a bit larger. However, I'm now glad that it's not. One thing I've learned about myself over time is that no matter how big a sketching bag is, I know how to fill it to the brim, and I'm going to do that! Therefore, the secret for me to traveling light is to have a small bag that can only accommodate so much. In my dreams, I have a large, light bag. It contains everything I ever wanted, and there is plenty of room left over. But in reality, my bags are always packed to the brim with way more stuff than I could ever use in a single outing. Clearly the supplies in the photo above are more than ample for a sketch outing. One day last weekend, I forced myself to cut the contents in half, and I didn't find myself missing a thing when I went to sketch! So now I can honestly say that the pouch is perfect for its intended purpose. I love it. And it's mine. And I'm not giving it up. So if you want your own, you'll just have to hustle on over to JetPens and get one for yourself.


Saturday

Waiting for My Car

6x18", across the two page spread of a Stillman & Birn prototype hardbound Beta sketchbook

I got a flat tire on my way home from delivering paintings to a show a couple of weeks ago! I was driving around looking for a good sketching location when I heard a strange noise and pulled over to the side of the road. Fortunately, at that point I was only five minutes from my husband's office, and what a guy! He came over and changed the tire for me. 

The next morning I took my car to the repair shop for a new tire and an oil change. They were so fast that I didn't even have time to finish my sketch. I didn't realize at the time that the bright red car on the left belonged to the guy who did the work on my car. He was happy to see it immortalized in my sketchbook! I told them if they had taken longer, I would have been able to finish my sketch. They replied that if they hadn't been so slow, I'd not have had time to sketch!

Friday

Sketching with Mary on a Rainy Day

6x18", Watercolor
Across a two page spread in a Stillman & Birn Beta hardbound 6x9" sketchbook (prototype)

It's not always easy to find a composition that will work across a two page spread in a landscape format book. My friend Mary had this long boat sculpture that helped ease my way across the spread! She came over to sketch on a rainy day in April. We set out spring flowers from our gardens and all sorts of odds and ends and had a blast. Bleeding Hearts and Bluebells were in abundance that day.

Thursday

Big News from Stillman and Birn

Two page spread from a Stillman & Birn Beta prototype hardbound sketchbook
Watercolor, 6x18" (across the spread)
Click image if you'd like to see it larger

My dream has come true. Stillman and Birn has announced on their Facebook page that they will be expanding their lineup and producing hardbound sketchbooks with their extra heavy weight 180lb Beta and Delta paper. I think I've been waiting for this moment from the first time I ever opened up a sketchbook. For a multimedia artist who loves stitchbound books that open flat, this is a major event and game-changer!

The two page spread above was done in a 6x9" landscape format prototype with Beta paper. I worked across the spread to get the 18". The pages lie so flat that you can barely see the seams, and the paper is so heavy weight that there is no ghosting from images on the other side of the page. It's fabulous!

The books will be produced in the 5.5x8.5", 8.5x11", and European A4 size portrait formats, and not in this landscape 6x9" format shown above. Nevertheless, it has been a thrill to have a sneak peek and to be able to work in one of these babies, and to finally be able to share the good news. This Dogwood Blossoms sketch that I posted a few days ago was also done in this book. I now have my paws on prototypes of the 5.5x8.5" and 8.5x11" sizes, and cannot wait for a chance to dive in!

Dogwood Blossoms

Image can be clicked for a larger version
6x18" on Stillman & Birn Beta paper
Watercolor

My favorite way to work in watercolor is to Just Do It. No pencil lines (or just a few for compositional guidance), no ink......Just straight in directly with a brush and pigment, getting as much down in a single pass as possible. There's something very unique about the way watercolor glows and jumps off the page when it's not fussed with. About six months ago, I ditched the non-transparent colors in my watercolor palette, and found that also made a huge difference in getting the paint and paper to give each other their very best.

That's not to say that I don't need to occasionally bail myself out with opaque lights like Cadmium Yellow or even Titanium White, or that I don't enjoy working with opaque color at times too --- especially on a toned surface. I do. But in restructuring my palette over the past six months, I decided to use gouache for that purpose. After all, if you need to go opaque, that's the way to do it. I took one of the Schmincke palettes that comes with two rows of half pans, removed the metal plate, and squeezed five (yes, five!) rows of half pans into it. Three of those rows were watercolor, and two were gouache. You may recall the post I did about that palette not too long ago. Here's my color chart from that set, as of last week:

It gave me a lot to choose from, but it proved to be heavy for hiking in the mountains. So last week, I pulled out my old palette, which is this one:


I discovered that by removing the metal plate and turning the half pans sideways, I could fit a fourth row into that smaller palette, and it's a lot lighter too. It was hard deciding which colors would stay and which would go, but this is the configuration I eventually ended up with:
 Yep, I'm down to one row of gouache, and kept three rows of transparent watercolor pigments. The dogwood blossoms sketch was one of my test drives for this new setup. So far, it seems to be working, and I'm happy with the lighter weight. Of course, when I need to travel super-light, I can always resort to the mini set I posted yesterday.

This is all a long-winded way of saying that as artists, our ideas continue to change, evolve, and come back around. It's all part of the fun of exploring our world of materials. What we work with depends on what we're painting, what we're painting on, how much time we have, what we're able to carry, and where we're going. And of course as watercolor painters well know, one can never have too many palettes! ;)

I know I promised a tour of my little red sketch kit for today, but I realized I need to take one more photo and do the image adjustment before I can write that post. It will come soon though!

Wednesday

Willow Tree in the Front Yard and Lilliput Review

11x17" across a two page spread in an 8.5x11" Stillman & Birn Epsilon hardbound sketchbook
Ink and Watercolor

I've been admiring the character these willow trees on our property, and looking forward to an opportunity to get out and sketch them. Yesterday after dinner, I was finally able to give into that temptation and scoot outside for 20 minutes or so. I set my stool in front of this massive willow tree and took out my beloved Kaweco Lilliput fountain pen, which is filled with Platinum Carbon Black ink. I love this pen. When closed, it is teeny tiny and perfect for my small sketching kit. The cap screws onto the back, so it posts firmly, and becomes long enough to sketch comfortably. If you click that link above, you can see lots of different views of the pen with a penny for size reference. Below is a photo of it next to my new (ultra-cool and more about this soon) Uni Gel pencil, so you can get an idea of the size compared with a mechanical pencil. I think this photo actually makes it appear larger than it is though.


I'm a big fan of Kaweco fountain pens and have quite an assortment. They are smooth, wet writers and highly reliable. The plastic-barrel Kaweco Sport pens can be converted to eyedropper pens, but since the ink can corrode metal, the Lilliput model cannot be converted. It has other benefits though, like its compact size, and the way it slips into my small sketch bag like a long silver bullet. It never leaks. It always starts right up. It writes like a dream and can keep up with my quick sketching without skips. For a little pen to slip into a pocket or small pouch, it simply can't be beat.

You can see in the photo above that the Lilliput pen, when posted with the cap, is certainly an adequate size for writing and sketching. It is thinner than a regular fountain pen, though that doesn't bother me.

After drawing for awhile, I decided to entertain my inner color junkie, and pulled out my mini watercolor set. That and a waterbrush were all I needed to complete the large, two-page spread. These three items --- Lilliput, waterbrush, and mini pan set, could have fit into a pocket. The little watercolor set can be found at Wet Paint. I pop out the kids' paints and substitute with my artist grade tube colors. For this sketch, I used Winsor Newton French Ultramarine, Aureolin, Brown Madder, and Daniel Smith Quinacridone Gold.

Tomorrow I'll take you on a tour of the little red bag in the photo. It is host to the contents of my current "small sketch kit". I can toss that pouch into any bag or backpack and I'm ready to go on a sketch outing.